
You cannot physically convert a conventional oven into an air fryer due to fundamental design differences in heating and airflow. However, you can significantly improve your oven’s performance for crispy, air-fryer-like results by strategically adjusting temperature, rack position, cooking time, and using convection mode if available. Master these simple tweaks to achieve deliciously crispy food without buying new appliances.
Key Takeaways
- No Physical Conversion Possible: Conventional ovens lack the rapid, targeted airflow and compact chamber of true air fryers; attempting hardware modifications is unsafe and ineffective.
- Leverage Convection Mode: If your oven has a convection setting (fan + heating element), use it! This is the single biggest factor for achieving air-fryer crispiness by circulating hot air.
- Lower Temperature by 25°F (15°C): Air fryers cook faster due to intense convection. Reduce your standard oven recipe temperature by 25°F to prevent burning while ensuring thorough cooking.
- Optimize Rack Position & Use Baking Sheets: Place food on the middle rack for even heat. Use a wire rack *inside* a baking sheet to elevate food, allowing hot air to circulate underneath for all-over crispness.
- Shorten Cooking Time & Check Early: Start checking food 5-10 minutes before the recipe’s suggested end time. Air-fryer-like results in a conventional oven often happen faster than standard baking.
- Don’t Overcrowd the Pan: Give food space! Crowding traps steam, leading to soggy results instead of crispiness. Cook in batches if necessary.
- Use the Broiler Strategically: For the final minute or two, switch to the broiler (watch closely!) to add a quick, intense blast of top heat for extra browning and crisp.
Quick Answers to Common Questions
Can I put an air fryer basket inside my conventional oven?
Generally, no. Most air fryer baskets are made of lightweight materials not designed for conventional oven temperatures and may warp, melt, or become a fire hazard. Stick to oven-safe metal wire racks and baking sheets.
Why is my food still soggy even using convection and a wire rack?
The most common culprits are overcrowding the pan (trapping steam) or not patting food dry enough before cooking. Ensure pieces have space, use the wire rack correctly, and dry proteins/veggies thoroughly with paper towels.
Should I preheat my oven longer for “air frying” tasks?
Preheat as you normally would (usually 10-15 minutes). The key is ensuring the oven reaches the *correct* temperature (verified by an oven thermometer), not necessarily preheating longer. Proper preheating is essential for consistent results.
Can I use parchment paper with the wire rack method?
Yes, but it reduces the airflow benefit underneath. If you must use it (for very sticky items), poke holes in the parchment or use a silicone baking mat designed for airflow instead. The wire rack alone is best for maximum crisp.
Is convection mode safe for all foods?
Convection is excellent for most roasting, baking, and “air frying” tasks. However, it can sometimes dry out very delicate items like custards or cause excessive rising in cakes. For these, use standard bake mode.
📑 Table of Contents
- Why You Can’t (and Shouldn’t) Physically Convert Your Oven to an Air Fryer
- Mastering Your Oven’s Convection Mode: Your Secret Weapon
- Strategic Temperature & Timing Adjustments: The Air Fryer Effect
- Optimizing Rack Position & Cookware for Maximum Crisp
- Leveraging the Broiler for the Final Crisp Boost
- Adapting Recipes & Troubleshooting Common Issues
- Conclusion: Your Conventional Oven, Air Fryer Results
Why You Can’t (and Shouldn’t) Physically Convert Your Oven to an Air Fryer
Let’s tackle the biggest myth head-on: you cannot physically convert a standard conventional oven into a true air fryer. It’s a bit like trying to turn a sedan into a race car by just adding a spoiler – the fundamental engineering is completely different. Understanding why is crucial for your safety and realistic expectations.
The Core Difference: Airflow is Everything
Air fryers work by using a powerful, high-speed fan located right above a compact heating element. This fan rapidly circulates superheated air (often exceeding 400°F/200°C) in a very small, enclosed chamber. This intense, direct convection blast cooks food incredibly fast from all sides simultaneously, creating that signature crispy exterior while keeping the inside moist. Think of it like a mini, supercharged convection oven designed specifically for this task.
Conventional ovens, even those with a convection setting, operate differently. Their heating elements are usually at the top and/or bottom, and the convection fan (if present) is less powerful and designed for more general, even baking across larger cavities. The airflow isn’t as concentrated or rapid. The chamber is much larger, meaning the hot air has more space to dissipate before hitting your food. Modifying a conventional oven’s internal structure, wiring, or adding an air fryer’s specific fan system is not feasible for a home user and poses significant fire and electrical hazards. Don’t attempt it!
Safety First: The Dangers of DIY Modifications
Ovens operate at extremely high temperatures and use substantial electrical power. Tampering with the internal wiring, heating elements, or adding unauthorized components like fans can easily lead to:
- Electrical shorts and fires: Incorrect wiring or overloaded circuits are a major risk.
- Overheating and component failure: Adding a fan might disrupt the oven’s carefully calibrated thermal management.
- Voiding warranties and insurance: Any modification typically invalidates your oven’s warranty and could void your home insurance if a fire occurs.
- Exposure to live electricity: Working inside an oven cavity is extremely dangerous.
The only safe and effective “conversion” is learning how to use your existing oven’s features more strategically to mimic air fryer results. This approach leverages what your oven *already* does well, just with smarter settings and techniques. It’s free, safe, and gets you remarkably close to that air-fried texture you crave.
Mastering Your Oven’s Convection Mode: Your Secret Weapon
If your oven has a convection setting (often marked with a fan icon), this is your absolute best friend for achieving air-fryer-like results. It’s the closest built-in feature you have to an air fryer’s core mechanism.
Visual guide about How to Adjust Conventional Oven to Air Fryer 2
Image source: i.pinimg.com
How Convection Mode Bridges the Gap
Convection mode activates an internal fan that circulates the hot air generated by the heating elements. This does several amazing things:
- Eliminates hot and cold spots: Hot air is constantly moving, ensuring more even cooking throughout the oven cavity.
- Increases effective cooking temperature: The moving air transfers heat to your food more efficiently than still air. This means food cooks faster and often at a lower *set* temperature.
- Promotes browning and crispness: The constant airflow helps evaporate surface moisture on your food faster, which is essential for achieving that coveted crispy exterior. Still air allows moisture to linger, leading to steaming and sogginess.
Think of convection mode as turning your conventional oven into a “better” conventional oven, specifically optimized for the kind of rapid, even, crispy cooking that air fryers excel at. It doesn’t make it an air fryer, but it dramatically closes the performance gap.
Using Convection Mode Effectively for “Air Frying”
Simply switching on convection isn’t enough; you need to adjust your approach:
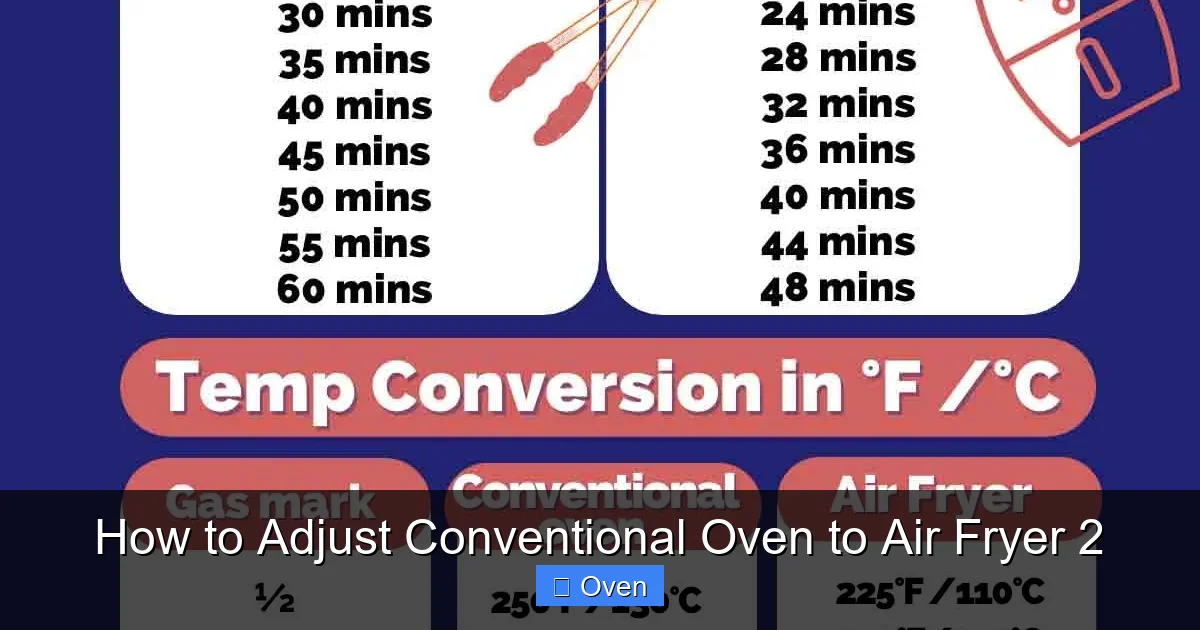
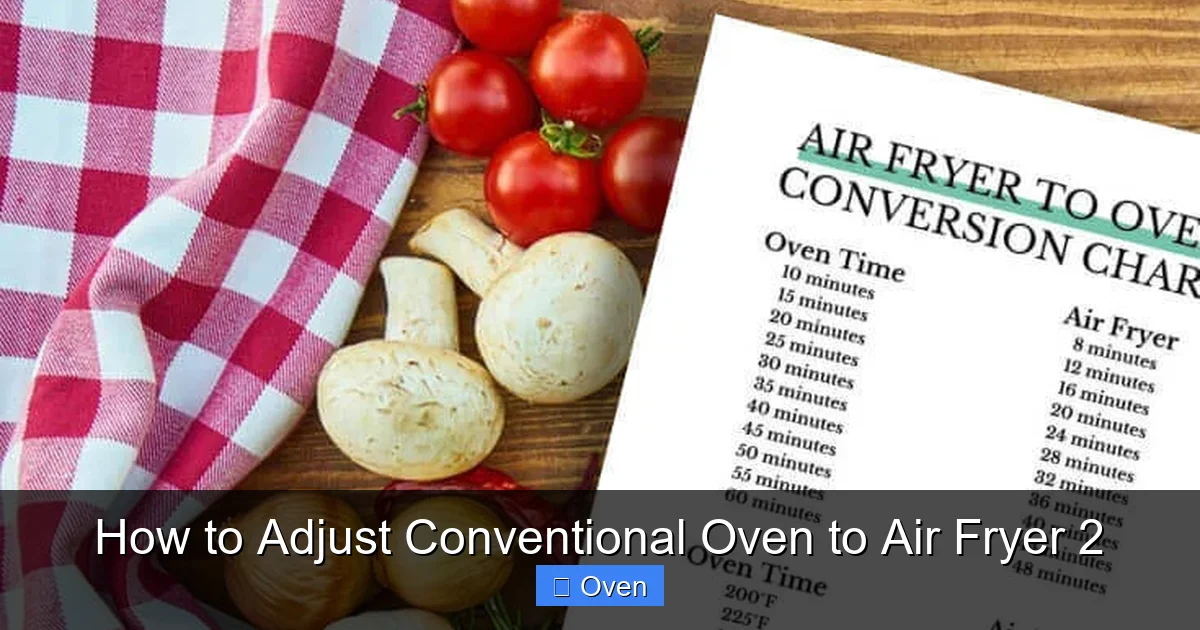
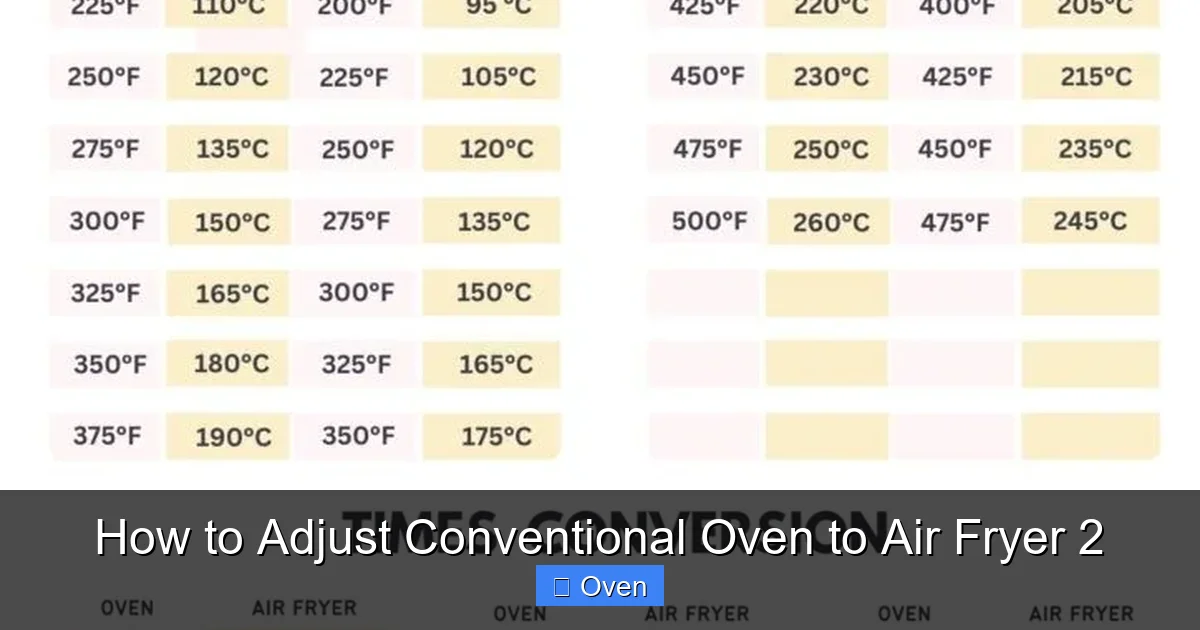
- Lower the Temperature: This is critical! Because convection cooks faster and more efficiently, always reduce the temperature specified in a standard baking recipe by 25°F (15°C). For example, if a recipe says 400°F for roasting vegetables, set your convection oven to 375°F. If it says 350°F for baking chicken, use 325°F convection. This prevents burning while ensuring the inside cooks through.
- Shorten Cooking Time: Start checking your food 5-10 minutes before the original recipe’s suggested end time. Convection speeds things up significantly. A potato that normally takes 45 minutes might be done in 35-40 minutes on convection.
- Don’t Rely Solely on Recipe Times: Oven temperatures vary wildly. Use visual cues (deep golden brown color, crispy edges) and internal thermometers (for meats) as your primary doneness indicators, not just the clock.
- Ensure Proper Airflow: Never block the convection fan vent (usually near the top back of the oven). Don’t overcrowd the oven with multiple large pans; give food space for air to circulate.
Pro Tip: If your oven has a “Convection Bake” vs. “Convection Roast” setting, use “Convection Roast” for meats, potatoes, and vegetables where you want maximum browning and crispness. Use “Convection Bake” for more delicate items like cakes or casseroles where gentle, even heat is better.
Strategic Temperature & Timing Adjustments: The Air Fryer Effect
Even without convection mode, you can significantly improve your oven’s ability to produce crispy results by mastering temperature and timing tweaks. These adjustments compensate for the slower, less intense heat transfer of a standard bake.
Visual guide about How to Adjust Conventional Oven to Air Fryer 2
Image source: airfryers.net
The Essential 25°F (15°C) Reduction Rule
This is the golden rule for mimicking air frying in a conventional oven. Why? Air fryers cook food much faster due to their intense convection. If you use the same temperature as a standard oven recipe, your food will likely burn on the outside before the inside is cooked through.
- Example 1: Chicken Wings – Standard recipe: 400°F for 40-45 mins. Air Fryer: 380°F for 25-30 mins. Conventional Oven Adjustment: 375°F for 35-40 mins (check early!).
- Example 2: Roasted Vegetables – Standard recipe: 425°F for 25-30 mins. Air Fryer: 400°F for 15-20 mins. Conventional Oven Adjustment: 400°F for 20-25 mins (toss halfway).
- Example 3: Frozen French Fries – Standard recipe: 425°F for 15-20 mins. Air Fryer: 400°F for 10-15 mins. Conventional Oven Adjustment: 400°F for 12-18 mins (shake pan halfway).
Remember: This reduction is a starting point. Always monitor your food closely, especially the first few times you try a new recipe. Ovens vary, and factors like pan type and food quantity affect cooking time.
Mastering the Art of Checking Early and Often
Patience is key, but blind faith in the timer is not. Air-fryer-like results often happen faster than standard baking times suggest, even with the temperature reduction.
- Set Multiple Timers: Don’t just set one timer for the full estimated time. Set one for 5 minutes before the *minimum* expected time, and another for the full time. Check at the first timer.
- Look for Visual Cues: Deep, even golden brown color is your best indicator for crispiness. For meats, use an instant-read thermometer (chicken breasts 165°F, thighs 175°F).
- Listen and Smell: You’ll often hear sizzling intensify as food nears doneness. The aroma will become rich and toasty.
- The “Tug Test” for Proteins: For chicken thighs or fish, gently try to lift with tongs. If it releases easily from the pan and feels firm, it’s likely done.
Pro Tip: If food is browning too quickly on top but needs more time inside, loosely tent it with aluminum foil for the last few minutes of cooking. This protects the top while allowing the interior to finish cooking.
Optimizing Rack Position & Cookware for Maximum Crisp
Where you place your food in the oven and what you cook it on makes a massive difference in achieving that air-fried crispiness. It’s all about facilitating airflow and heat contact.
Visual guide about How to Adjust Conventional Oven to Air Fryer 2
Image source: the-bella-vita.com
The Power of the Middle Rack
For most “air frying” tasks in a conventional oven, the middle rack position is ideal. Why?
- Balanced Heat: It’s farthest from the intense direct heat of the top broiler element and the bottom heating element, promoting more even cooking.
- Optimal Airflow: In convection mode, the middle rack allows the circulating air to reach the food from all sides effectively. Even in standard bake, it avoids the extremes.
- Prevents Burning: Top rack = risk of top burning before inside cooks. Bottom rack = risk of bottom burning or steaming if too close to the element.
Exception: If you’re specifically using the broiler for the final minute or two to add top crisp (see next section), you might move the rack up one position *only* for that very short burst.
The Wire Rack Inside a Baking Sheet: Your Crispness Catalyst
This simple hack is arguably the most effective technique for getting air-fryer-like results in a conventional oven. Here’s why and how:
- Why it Works: A standard baking sheet traps heat and steam *under* the food, leading to soggy bottoms. Placing a wire rack *inside* the baking sheet elevates the food, allowing hot air to circulate completely around it – top, sides, AND bottom. This mimics the 360-degree airflow of an air fryer basket.
- How to Do It: Choose a sturdy, oven-safe wire rack that fits snugly inside your baking sheet (rimmed baking sheets work best). Place the rack inside the sheet. Arrange your food on the rack, ensuring pieces aren’t touching. The baking sheet catches any drips.
- Best For: Chicken wings, drumsticks, tofu, roasted vegetables (especially broccoli, cauliflower, Brussels sprouts), fish fillets, reheating pizza, frozen appetizers.
- Pro Tip: Lightly spray the wire rack with cooking oil before adding food to prevent sticking, especially with marinated items or sugary glazes.
Avoid: Glass or ceramic dishes for “air frying” tasks. They retain moisture and don’t allow air circulation underneath, leading to steaming rather than crisping.
Leveraging the Broiler for the Final Crisp Boost
Your oven’s broiler (grill) is a powerful tool for adding that last-minute burst of intense top heat, perfect for finishing off dishes to achieve an extra-crispy, restaurant-quality sear – something air fryers do exceptionally well.
Safe and Effective Broiler Use
Broilers are incredibly hot (often 500°F+) and require constant attention. Never walk away! Here’s how to use it strategically:
- Timing is Everything: Only use the broiler for the final 1-3 minutes of cooking. Your food should already be nearly done through the main cooking phase (using convection or adjusted bake).
- Rack Position: Place the rack in the top position (usually 3-6 inches from the broiler element). Watch closely – things can go from perfect to burnt in seconds.
- Constant Vigilance: Stand by the oven! Check every 30-60 seconds. Rotate the pan if your broiler has hot spots.
- What to Broil: Ideal for finishing chicken wings, salmon fillets, halloumi cheese, thick-cut bacon, or adding a char to peppers/onions. Less ideal for delicate fish or items prone to drying out quickly.
Pro Tip: If your oven has a “Convection Broil” setting, use it! The fan helps distribute the intense broiler heat more evenly, reducing the risk of burning one spot while another remains pale.
Combining Techniques: The Ultimate Crisp Sequence
For maximum air-fryer-like results, combine convection mode, the wire rack trick, and a broiler finish:
- Preheat oven to convection mode at 25°F lower than standard recipe temp.
- Place wire rack inside baking sheet. Arrange food on rack.
- Cook on middle rack for 75-80% of the standard recipe time (check early!).
- If browning is good but needs more top crisp, switch to broiler (top rack position) for 1-2 minutes, WATCHING CONSTANTLY.
- Remove when deeply golden and crispy.
Example: Chicken Wings: Convection 375°F for 25 mins (on wire rack), then Broiler 2 mins for perfect crisp.
Adapting Recipes & Troubleshooting Common Issues
Successfully “air frying” in your conventional oven often requires tweaking standard recipes. Knowing how to adapt and fix common problems is key.
Recipe Adaptation Cheat Sheet
- Frozen Foods: Reduce temp by 25°F. Add 2-5 mins to standard time (they start colder). Shake pan halfway. *No need to thaw.*
- Marinated Meats: Pat meat *extremely* dry before cooking. Moisture is the enemy of crisp! Reduce marinade sugar content if possible (sugar burns easily).
- Vegetables: Toss with oil (essential for browning/crisp), salt, and dry spices. Avoid wet herbs/sauces until the end. Cut uniformly for even cooking.
- Breading: For crispy coatings (like chicken tenders), use a wire rack. Let breaded items rest 5-10 mins before cooking to help coating adhere. Spray lightly with oil.
- Reheating: Perfect for reviving pizza, fries, or nuggets! Convection 350°F for 3-5 mins on wire rack. Much better than the microwave!
Troubleshooting Soggy, Burnt, or Uneven Results
- Problem: Soggy Bottoms/Overall
Cause: Trapped steam, overcrowding, no wire rack, too low temp.
Solution: USE THE WIRE RACK! Don’t overcrowd the pan. Ensure temp is correct (use oven thermometer!). Pat food dry. Increase temp slightly next time (if not burning).
- Problem: Burnt Outside, Raw Inside
Cause: Temperature too high, oven runs hot, food too thick.
Solution: Double-check you reduced temp by 25°F. Use oven thermometer to verify actual temp. Check food earlier. Tent loosely with foil if browning too fast. Cut food into smaller, uniform pieces.
- Problem: Uneven Cooking/Browning
Cause: Hot spots in oven, overcrowding, wrong rack position.
Solution: Rotate pan halfway through cooking. Use middle rack. Don’t overcrowd. Know your oven’s hot spots (test with toast). Ensure convection fan is working.
- Problem: Food Sticking
Cause: Insufficient oil, rack not sprayed, food not seared properly.
Solution: Lightly oil the wire rack and/or food. Ensure pan is hot before adding food (preheat oven fully!). Don’t move food too early – let it sear and release naturally.
Essential Tool: Oven Thermometer – Oven dials are notoriously inaccurate. Investing in a simple oven thermometer ($10-$15) is the single best thing you can do for consistent results. Place it on the middle rack to see the *actual* temperature.
Conclusion: Your Conventional Oven, Air Fryer Results
While the dream of physically converting your conventional oven into an air fryer remains just that – a dream – the reality is incredibly promising. By understanding the core principles of air frying (rapid, circulating hot air) and strategically leveraging your oven’s existing features, you can achieve remarkably similar crispy, delicious results without spending a dime on new appliances.
Remember the non-negotiables: Embrace convection mode if you have it, always reduce the temperature by 25°F (15°C), master the wire rack inside a baking sheet technique, check your food early and often, and never overcrowd the pan. These simple adjustments transform your oven’s capabilities. Pat food dry, use the broiler strategically for the final flourish, and don’t forget that trusty oven thermometer to tame your oven’s quirks.
The journey to oven-based “air frying” mastery is about working smarter, not harder (or dangerously modifying hardware). It’s about respecting the physics of heat and airflow within the appliance you already own. So, the next time a recipe calls for an air fryer, don’t despair. Preheat that convection setting, grab your wire rack, and get ready to enjoy perfectly crispy wings, golden roasted veggies, or revitalized leftovers – all from the reliable heart of your kitchen, your conventional oven. You’ve got this!
Frequently Asked Questions
Can I actually turn my regular oven into an air fryer?
No, it’s not possible or safe to physically convert a conventional oven into a true air fryer. Air fryers have a specific compact design with a powerful top fan and heating element that creates intense, rapid convection impossible to replicate by modifying a standard oven. Attempting hardware changes poses serious fire and electrical risks.
What’s the single best thing I can do to make my oven work like an air fryer?
If your oven has a convection setting, using it is the most impactful step. Combine this with reducing the recipe temperature by 25°F (15°C) and cooking food on a wire rack placed inside a baking sheet. This combination maximizes airflow and heat transfer, mimicking the air fryer effect most effectively.
Why do I need to lower the temperature when using my oven like an air fryer?
Air fryers cook food much faster due to their intense convection. If you use the same temperature as a standard oven recipe, the outside will likely burn before the inside is fully cooked. Lowering the temperature by 25°F compensates for this faster cooking rate, ensuring even doneness without charring.
Do I need a special pan to get crispy results in my oven?
Yes, using the right cookware is crucial. A standard baking sheet traps steam underneath food, leading to sogginess. The best method is to place a sturdy wire rack *inside* a rimmed baking sheet. This elevates the food, allowing hot air to circulate completely around it for all-over crispness, just like an air fryer basket.
How much time should I save when cooking compared to a regular oven recipe?
Start checking your food 5-10 minutes before the original recipe’s minimum suggested time. Convection mode significantly speeds up cooking, and even standard bake with temperature adjustments often cooks faster than expected for crispy items. Always rely on visual cues (deep browning) and internal temperature (for meats) rather than just the clock.
Can I use the broiler to help achieve air fryer crispness?
Absolutely, but use it strategically and safely. Only apply the broiler for the final 1-2 minutes of cooking when the food is nearly done. Place the rack in the top position, watch it constantly, and be ready to remove it immediately to prevent burning. This adds a quick burst of intense top heat for extra crispness.