Brewing the perfect cup of coffee starts with fresh beans and precise measurements. This guide reveals pro secrets for balanced flavor, avoiding bitterness or weakness. Follow these steps to transform your daily ritual into a moment of pure coffee bliss.
Key Takeaways
- Freshness is non-negotiable: Use beans roasted within 2-4 weeks and grind just before brewing for maximum flavor.
- Grind size dictates everything: Match your grind to your brewing method – coarse for French press, fine for espresso.
- Water quality matters as much as coffee: Filtered water at 195-205°F (90-96°C) extracts optimal flavor without scalding beans.
- Ratios are your secret weapon: Start with 1:16 coffee-to-water ratio (e.g., 20g coffee to 320g water) and adjust to taste.
- Timing is critical: Under-extract for sourness, over-extract for bitterness – aim for 3-4 minutes total brew time.
- Clean equipment is essential: Residual oils in grinders or brewers ruin freshness; clean weekly.
- Experiment fearlessly: Your perfect cup is personal – tweak variables one at a time to find your ideal balance.
Quick Answers to Common Questions
What’s the single most important thing for great coffee?
Using freshly roasted beans (within 2-4 weeks) and grinding them just before brewing. Stale or pre-ground coffee is the biggest flavor killer.
Can I use tap water for coffee?
It’s possible, but filtered water makes a huge difference. Tap water with chlorine, heavy minerals, or impurities will negatively impact flavor. A basic filter pitcher is a great start.
Why does my coffee taste bitter?
Bitterness usually means over-extraction. Common causes: grind too fine, water too hot, brew time too long, or using too much coffee. Try a coarser grind or slightly cooler water first.
Do I really need a scale?
Yes! Volume measurements (scoops, tbsp) are inconsistent. A $10-15 digital kitchen scale ensures precise coffee-to-water ratios, which is fundamental for consistency and the perfect cup.
How long do coffee beans stay fresh?
For optimal flavor in filter coffee, use beans within 2-4 weeks of their roast date. Store them airtight at room temperature. Avoid the fridge or freezer for daily use.
📑 Table of Contents
- The Quest for Coffee Perfection: More Than Just a Morning Ritual
- The Foundation: Choosing and Storing Your Beans
- The Grind: Where Most Home Brewers Go Wrong
- Water Wisdom: The Hidden Ingredient
- Brewing Methods Demystified: Finding Your Perfect Match
- Perfecting Your Process: Pro Tips for Consistency
- Conclusion: Your Perfect Cup Awaits
The Quest for Coffee Perfection: More Than Just a Morning Ritual
Let’s be honest: that first sip of coffee should feel like a warm hug for your soul. But too often, we’re settling for bitter sludge or weak, watery disappointment. What if I told you brewing the perfect cup of coffee isn’t about expensive machines or barista secrets? It’s about understanding a few fundamental principles and paying attention to details most people overlook. Forget complicated jargon – this is about making coffee that tastes incredible, consistently, in your own kitchen.
Imagine waking up to a cup that’s rich but not harsh, smooth but not flat, with notes of chocolate or fruit shining through instead of just burnt bitterness. This isn’t a fantasy reserved for cafes. The perfect cup of coffee is absolutely achievable at home. It starts with respecting the bean, respecting the water, and respecting the process. In this guide, we’ll strip away the mystery and give you the practical, actionable steps to transform your daily brew from a chore into a cherished ritual. Get ready to elevate your coffee game – one perfect cup at a time.
The Foundation: Choosing and Storing Your Beans
You can have the fanciest grinder and brewer on the planet, but if your beans are stale or poorly stored, you’re fighting a losing battle. The journey to the perfect cup of coffee begins long before you even turn on the kettle.
Visual guide about How to Brew the Perfect Cup of Coffee
Image source: rockymountainsavings.com
Why Freshness is Your #1 Priority
Coffee beans are alive. After roasting, they release carbon dioxide – a natural process crucial for flavor development. But this also means they’re slowly losing volatile aromatic compounds that create those beautiful notes we love. Beans roasted more than 4 weeks ago are likely past their prime for most brewing methods. Look for a roast date on the bag, not just a “best by” date. Roast dates tell you exactly when the magic happened. For filter coffee (pour-over, drip), aim to use beans within 2-4 weeks of roasting. Espresso lovers might push it to 5-6 weeks, but freshness still rules.
Pro Tip: Buy smaller quantities more frequently. A 12oz bag might last you a month – that’s too long! Opt for 8oz bags and restock every 10-14 days. Your taste buds will thank you.
Storage: Keeping the Flavor Locked In
Once you have fresh beans, storing them correctly is vital. Oxygen, light, heat, and moisture are the enemies of flavor. Ditch the flimsy bag they came in (unless it has a one-way valve and you’re using it within a week). Transfer beans to an opaque, airtight container at room temperature. Glass jars with rubber seals or dedicated coffee canisters work great. Avoid clear containers – light degrades coffee. Keep them away from the stove, dishwasher, or fridge (fridges introduce moisture and absorb odors; freezers cause condensation).
Myth Busting: Freezing beans isn’t ideal for everyday use. While it *can* preserve beans for months, repeated thawing causes condensation inside the bag/container, leading to stale, soggy beans. Only freeze if you’re storing beans long-term (3+ months) and portion them into single-use airtight bags.
Bean Style: Finding Your Flavor Match
Do you love bright, fruity notes or deep, chocolatey richness? Understanding bean origins and roast levels helps you choose beans suited to your taste and brewing method. Light roasts highlight origin characteristics (think Ethiopian berries or Kenyan citrus) and work beautifully with pour-over methods. Medium roasts offer balance – caramel sweetness with some origin notes – and are versatile for drip, pour-over, or Aeropress. Dark roasts deliver bold, smoky, or chocolatey flavors but can mask origin subtleties; they’re classic for espresso or French press. Don’t be afraid to experiment! Your perfect cup of coffee might be a vibrant light roast or a comforting dark roast – the key is matching it to how you brew.
The Grind: Where Most Home Brewers Go Wrong
Grinding coffee seems simple, but it’s arguably the most critical step most people mess up. Think of coffee grounds like puzzle pieces: the size determines how water flows through them and extracts flavor. Get the grind wrong, and you’re guaranteed disappointment, no matter how good the beans are.
Visual guide about How to Brew the Perfect Cup of Coffee
Image source: i.pinimg.com
Why Grind Size is Non-Negotiable
Imagine trying to make tea with whole tea leaves versus crushed leaves. The surface area exposed to water makes all the difference. Coffee is the same. A coarse grind (like sea salt) has less surface area, so water flows through quickly, extracting less – perfect for immersion methods like French press where coffee steeps for minutes. A fine grind (like powdered sugar) has massive surface area, so water extracts flavor rapidly – essential for espresso where water passes through in seconds. Using a fine grind in a French press? You’ll get muddy, over-extracted sludge. Using a coarse grind for espresso? You’ll get weak, sour water. Match your grind size to your brewing method.
Pro Tip: If your coffee tastes consistently sour, try a finer grind. If it’s consistently bitter or harsh, try a coarser grind. It’s often the quickest fix!
Grinder Types: Blade vs. Burr – The Great Debate
Blade grinders (the cheap, whirly-blade kind) are inconsistent. They chop beans into a mix of dust and boulders. This unevenness means some particles over-extract (bitter) while others under-extract (sour) in the same brew – hello, unbalanced cup! For the perfect cup of coffee, invest in a burr grinder. Burr grinders crush beans between two abrasive surfaces (burrs), producing uniform particle sizes. This consistency is key to even extraction and balanced flavor.
Don’t have a burr grinder yet? Blade grinders can work in a pinch: pulse in short bursts, shake the grinder, and pulse again. Sift the grounds through a fine mesh strainer to remove large boulders and fine dust. It’s not ideal, but it’s better than nothing. Seriously, though – a $30-50 burr grinder is the single best upgrade you can make for your coffee.
Grinding Fresh: The Golden Rule
Pre-ground coffee is the enemy of flavor. Once coffee is ground, oxidation and staling happen rapidly – within minutes, not days. Those beautiful volatile aromas start vanishing the moment the cell walls break open. Grinding just before brewing preserves the maximum flavor potential. It’s the difference between hearing a symphony live versus listening to a muffled recording. Make grinding part of your ritual, not a chore you do days in advance. Your future perfect cup of coffee self will be grateful.
Water Wisdom: The Hidden Ingredient
We spend so much time obsessing over beans and grinders, but water makes up 98-99% of your brewed coffee. Using bad water is like making a gourmet meal with tap water full of chlorine and minerals – it ruins everything. Water quality and temperature are silent heroes (or villains) in your quest for the perfect cup of coffee.
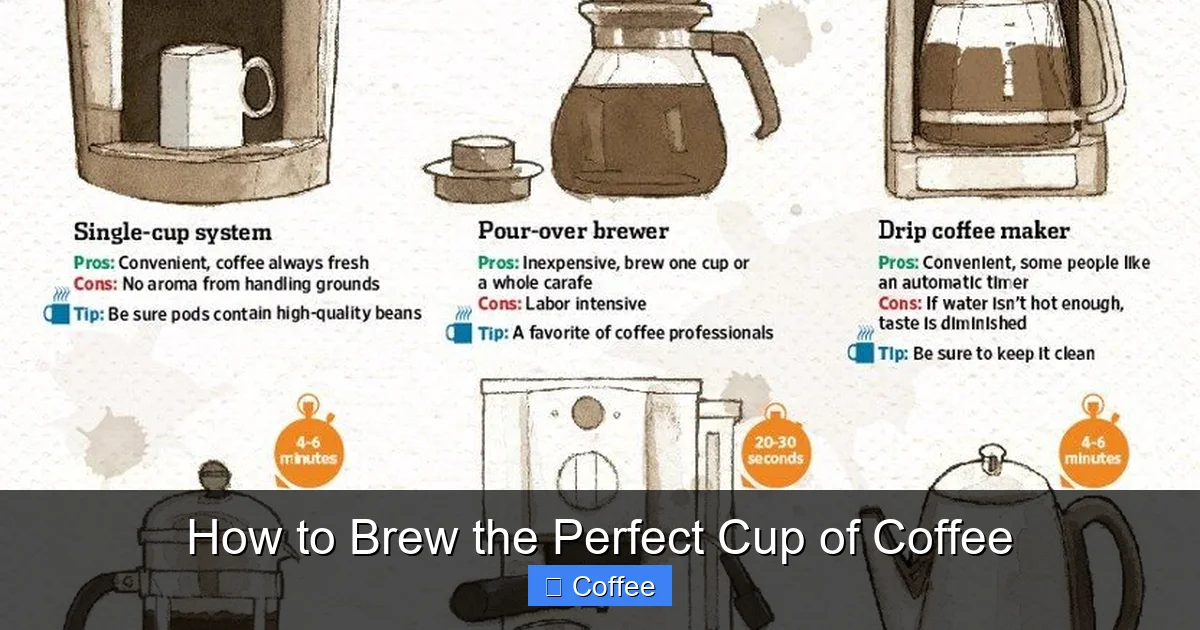
Visual guide about How to Brew the Perfect Cup of Coffee
Image source: img.freepik.com
Quality Matters: Filter Your Water
Tap water varies wildly. Hard water (high in calcium/magnesium) can mute coffee flavors and cause scale buildup in equipment. Soft water (low minerals) can make coffee taste flat. Chlorine or other additives in municipal water impart unpleasant chemical notes. The simplest solution? Use filtered water. A basic pitcher filter (like Brita) removes chlorine and some impurities, significantly improving taste. For the absolute best results, consider a dedicated water filter designed for coffee (like Third Wave Water minerals) or use high-quality bottled spring water. Avoid distilled or reverse osmosis water alone – they lack minerals that help extract coffee’s good flavors.
Temperature: The Sweet Spot for Extraction
Water that’s too cold under-extracts, leaving sour, weak coffee. Water that’s boiling (212°F/100°C) scalds the coffee, causing bitterness and astringency. The ideal brewing temperature range is **195°F to 205°F (90°C to 96°C)**. This is hot, but not quite boiling. Most electric kettles have temperature control – use it! If you don’t have a thermometer, bring water to a boil, then let it sit for 30 seconds off the heat. This usually drops it into the perfect range. For pour-over methods, pre-heating your vessel with hot water also helps maintain temperature stability during brewing.
Pro Tip: If your coffee tastes flat or sour, try increasing the water temperature slightly (within the safe range). If it’s bitter, try decreasing it.
The Coffee-to-Water Ratio: Your Flavor Blueprint
Guessing how much coffee to use leads to inconsistency. Too little coffee? Weak and watery. Too much? Overpowering and bitter. The Specialty Coffee Association recommends a starting point of **1:16 coffee-to-water ratio** (by weight). That means 1 gram of coffee for every 16 grams (or milliliters) of water. For a standard 12oz (355ml) mug, that’s roughly 22 grams of coffee. Use a digital kitchen scale – it’s the most accurate way. Volume measurements (scoops, tablespoons) are unreliable because coffee density varies. A scale costs less than a bag of good beans and is the single most impactful tool for consistency. Start with 1:16, then adjust: like stronger coffee? Try 1:15. Prefer it milder? Try 1:17. Find *your* perfect ratio.
Brewing Methods Demystified: Finding Your Perfect Match
There’s no single “best” brewing method – only the best method *for you* and your desired cup. Each method extracts coffee differently, highlighting various flavor aspects. Understanding the core principles helps you master any method and troubleshoot issues.
Pour-Over (V60, Chemex, Kalita Wave): Clarity and Control
Pour-over methods involve manually pouring hot water over coffee grounds in a filter. This offers incredible control over the brewing process, resulting in clean, bright, and complex cups that highlight origin characteristics. The key is a consistent, slow pour in concentric circles, saturating all grounds evenly. Total brew time should be 2:30 to 4:00 minutes for most recipes. Popular for light and medium roasts. Requires a gooseneck kettle for precise pouring – worth the investment for pour-over lovers.
Beginner Recipe (V60, 300ml water): 18g medium-fine grind coffee. Rinse filter with hot water. Add coffee. Start timer. Pour 50g water to bloom (let sit 30 sec). Slowly pour to 150g by 1:00 min. Pour to 250g by 2:00 min. Pour to 300g by 3:00 min. Total drawdown by 3:30-4:00 min.
French Press: Rich and Full-Bodied
The French press is an immersion brewer: coffee and water steep together for several minutes before a metal plunger separates them. This produces a full-bodied, rich cup with more oils and sediment than pour-over, often showcasing deeper chocolate or nutty notes. Coarse grind is essential to prevent sludge. Standard brew time is 4 minutes. Agitating the crust (floating grounds) after 1 minute can improve extraction.
Beginner Recipe (350ml): 22g coarse grind coffee. Add to press. Pour 350g water (200°F). Stir gently. Place lid, plunger up. Steep 4 minutes. Press plunger down slowly and steadily. Pour all coffee into cups immediately – don’t let it sit in the press, or it will over-extract.
AeroPress: Versatile and Fast
The AeroPress is a unique plunger-style brewer that can mimic immersion or pressure brewing. It’s incredibly versatile, forgiving, and makes a clean, smooth cup in under 2 minutes. You can brew concentrate for lattes or regular strength coffee. Experimentation is encouraged! Common methods include the “inverted” technique (plunger down first) to prevent dripping during steep.
Beginner Recipe (Standard, 250ml): 15g medium-fine grind coffee. Add to chamber. Pour 250g water (195°F). Stir 10 sec. Attach plunger, press gently over 20-30 sec. Total time ~1:30 min.
Automatic Drip: Convenience Done Right
Don’t dismiss the humble drip machine! Modern high-end models (like those meeting SCA standards) can brew excellent coffee. The keys are: proper water temperature (195-205°F), even saturation of the coffee bed, and correct brew time (4-6 minutes). Avoid cheap models with low water temps or uneven spraying. Use a scale to measure coffee and water, even in an automatic. Pre-wet the filter and carafe to eliminate paper taste.
Pro Tip: If your drip coffee is weak, try increasing the coffee dose slightly (e.g., 1:15 ratio) or ensuring the machine reaches proper temperature. If bitter, check grind size (might be too fine) or clean the machine thoroughly.
Perfecting Your Process: Pro Tips for Consistency
Mastering the variables gets you 90% of the way. The final 10% is about consistency, cleanliness, and those little tweaks that turn a good cup into the perfect cup of coffee. It’s the difference between “that’s nice” and “wow, this is incredible!”
The Bloom: Why 30 Seconds Matters
When you add hot water to freshly ground coffee, it releases carbon dioxide gas – this is the “bloom.” Pre-wetting the grounds (pouring just enough water to saturate them, about twice the coffee’s weight) and letting it sit for 20-40 seconds before continuing the pour serves two purposes: it allows gas to escape (preventing channeling – water finding paths of least resistance), and it kickstarts the extraction process gently. Skipping the bloom often leads to uneven extraction and a less vibrant cup. It’s a small step with a big impact.
Timing is Everything (But Don’t Obsess)
While total brew time is a useful guide (aim for 3-4 minutes for most methods), it’s more important to focus on *how* the water interacts with the coffee. A brew that finishes too fast (under 2:30 min) likely under-extracted (sour). One that drags on (over 5 min) likely over-extracted (bitter). Use time as a diagnostic tool, not a strict dictator. If your brew is consistently fast, try a finer grind or slower pour. If slow, try coarser grind or faster pour. Pay attention to the taste – that’s the ultimate timer.
Cleanliness is Next to Coffee Godliness
Residual coffee oils are incredibly sticky and turn rancid quickly. A dirty grinder, brewer, or carafe imparts stale, off-flavors into your fresh brew, sabotaging your efforts. Clean your grinder weekly (follow manufacturer instructions – often involves grinding rice or specialized cleaner). Wash brewers (French press, AeroPress, pour-over cones) immediately after use with mild soap and water. Descale your kettle and automatic drip machine monthly with vinegar or citric acid solution to remove mineral buildup that affects temperature and taste. A clean setup is non-negotiable for the perfect cup of coffee.
Taste, Adjust, Repeat: The Art of Refinement
Your first attempt might not be perfect – and that’s okay! The key is mindful tasting and systematic adjustment. Is it sour? (Under-extracted) → Try finer grind, hotter water, or more coffee. Is it bitter/astringent? (Over-extracted) → Try coarser grind, cooler water, or less coffee. Is it weak? → Increase coffee dose or decrease water. Is it flat? → Check water quality, bean freshness, or try a slightly higher dose. Change only *one* variable at a time so you know what fixed it. Keep a simple log: date, beans, grind size, ratio, water temp, time, tasting notes. Soon, you’ll dial in your personal perfect cup of coffee.
Conclusion: Your Perfect Cup Awaits
Brewing the perfect cup of coffee isn’t about achieving some unattainable ideal dictated by coffee snobs. It’s about understanding the beautiful, simple science behind extraction and applying a little attention to detail. It’s about respecting the bean, the water, and the process. It’s about moving beyond guesswork and embracing precision with your ratio, your grind, and your temperature.
Remember, the “perfect” cup is deeply personal. It might be a bright, floral pour-over that wakes up your senses, or a rich, comforting French press on a lazy Sunday. The journey to finding *yours* is part of the joy. Start with fresh beans, grind them just before brewing, use good water at the right temperature, measure your coffee and water, and clean your gear. Experiment fearlessly, taste critically, and adjust one thing at a time. That first sip of truly great coffee you make at home – the one that makes you pause and smile – is worth every minute of the learning process. So grab your scale, your kettle, and your favorite beans. Your perfect cup of coffee is waiting to be brewed. Now go make magic.
Frequently Asked Questions
What’s the best coffee brewing method for beginners?
The AeroPress is often recommended for beginners due to its forgiving nature, speed, and versatility. It’s hard to mess up and produces a clean, smooth cup quickly. A good French press is also simple and requires minimal equipment.
How much coffee should I use per cup?
Start with the Specialty Coffee Association’s golden ratio: 1 gram of coffee for every 16 grams (or milliliters) of water. For a standard 12oz (355ml) mug, that’s about 22 grams of coffee. Adjust slightly stronger (1:15) or milder (1:17) to your taste.
Why is my pour-over coffee sour?
Sourness typically indicates under-extraction. The most likely culprits are water temperature too low, grind size too coarse, or brew time too short. Try increasing the water temperature slightly (to 200°F) or using a finer grind setting.
Can I reuse coffee grounds?
It’s not recommended. Used grounds have already released most of their desirable flavors and oils. Reusing them typically results in a very weak, flat, and potentially stale-tasting cup with little complexity.
How often should I clean my coffee maker?
Clean your brewer (French press, AeroPress, pour-over cone) immediately after each use with mild soap and water. Descale your kettle and automatic drip machine monthly with vinegar or citric acid to remove mineral buildup. Clean your grinder weekly according to the manufacturer’s instructions.
Is dark roast coffee stronger than light roast?
Not in terms of caffeine content per bean – light roasts actually have slightly more caffeine by weight. “Strength” usually refers to perceived intensity of flavor. Dark roasts taste bolder and more robust due to the roasting process, but they have less origin character than light roasts.