Discover why your oven’s temperature might be lying to you and how to fix it. This guide shows you the simple, foolproof method to calibrate an oven temperature using a reliable thermometer. Stop guessing and start baking perfectly every time – it takes less than 30 minutes!
Key Takeaways
- Ovens are often inaccurate: Most home ovens run 25-50°F hotter or cooler than displayed, ruining recipes.
- An oven thermometer is essential: Your built-in dial or digital display cannot be trusted; a separate thermometer is the only way to know the truth.
- Calibration is simple & quick: The process involves checking the actual temperature against your oven’s setting and adjusting the calibration screw or control.
- Adjustment methods vary: Older mechanical ovens need a physical screw tweak, while newer digital models use menu settings.
- Regular checks are crucial: Recalibrate your oven every 6-12 months or after any power surge or oven repair.
- Accurate temps save time & food: Proper calibration prevents undercooked meals, burnt edges, and wasted ingredients.
Quick Answers to Common Questions
Can I use a meat thermometer to calibrate my oven?
Only if it’s specifically rated for high oven temperatures (usually 500°F+) and has a stable stand or probe holder that won’t melt or fall. Most instant-read meat thermometers aren’t designed for prolonged oven use. A dedicated oven thermometer is the safest, most reliable choice.
How do I know if my oven needs calibrating?
Signs include consistent undercooking or burning (especially edges/bottoms), recipes failing despite following them perfectly, or noticing the oven seems to cycle on/off unusually frequently. The only definitive way to know is to use an oven thermometer to check the actual temperature against the set point.
Is it hard to adjust the calibration screw on a mechanical oven?
It requires care but is manageable for most people. The key is small adjustments (1/8 turn or less), patience, and repeating the full preheat/stabilize/read process after each tweak. If you’re uncomfortable or can’t locate the screw, consult your manual or call a technician.
Do all digital ovens have a calibration menu?
Most modern digital ovens do, but the location and access method vary significantly by brand and model. Your user manual is the best resource. Searching online for your specific model’s calibration procedure is the next best step if you’ve lost the manual.
How accurate does my oven thermometer need to be?
Look for one with an accuracy of ±5°F or better. While laboratory-grade precision isn’t necessary, avoid the cheapest models which can be off by 20°F or more. Reputable brands like Taylor, CDN, or ThermoPro generally offer good accuracy for home use.
📑 Table of Contents
- Why Your Oven’s Temperature is Probably Lying to You (And Why It Matters)
- Essential Tools: What You Absolutely Need to Calibrate an Oven Temperature
- Step-by-Step: How to Calibrate an Oven Temperature (The Foolproof Method)
- Common Calibration Mistakes (And How to Avoid Them)
- When Should You Recalibrate Your Oven? (Don’t Wait for Disaster!)
- Pro Tips for Maintaining Accurate Oven Temperatures
- Conclusion: Take Control of Your Kitchen
Why Your Oven’s Temperature is Probably Lying to You (And Why It Matters)
You set your oven to 350°F, pop in the cookies, and eagerly wait. But when the timer dings, you pull out… hockey pucks. Or worse, raw dough in the center. Sound familiar? Before you blame the recipe or your skills, consider this: your oven’s temperature setting is likely lying to you. Seriously. Studies and countless home bakers confirm that most residential ovens are inaccurate, often running significantly hotter or cooler than the displayed temperature. This isn’t just an annoying quirk; it’s the silent killer of perfect cakes, evenly roasted vegetables, and juicy roasts.
Why does this happen? Ovens rely on a thermostat – a device that senses heat and tells the heating element when to turn on and off. Over time, this thermostat can drift out of calibration due to normal wear and tear, power fluctuations, or even just the oven’s age. The heating element itself might also degrade. The result? Your oven might think it’s at 350°F when it’s actually baking at 375°F (leading to burnt edges and raw centers) or struggling to reach 325°F (leaving your casserole lukewarm and unsafe). This inconsistency is why your favorite recipe from the internet fails, why your bread never rises quite right, and why you feel like you’re constantly fighting your oven. Learning how to calibrate an oven temperature isn’t just a nice-to-have skill; it’s fundamental to taking control of your cooking and baking success.
The Real Cost of an Uncalibrated Oven
Ignoring oven calibration has tangible consequences beyond frustration. Think about the time wasted on failed batches – that sunken cake meant an extra hour of baking and cleaning. Consider the money down the drain: expensive ingredients like good chocolate, fresh herbs, or prime cuts of meat ruined by incorrect temperatures. Food safety is also a concern; undercooked poultry or casseroles due to a too-cool oven can pose health risks. Even seemingly minor inaccuracies affect texture and flavor. A roast cooked at the wrong temperature might be dry and tough instead of succulent, or vegetables might be mushy instead of perfectly caramelized. The bottom line? An uncalibrated oven steals your confidence in the kitchen. You start second-guessing recipes, avoiding certain dishes, or worse, giving up entirely. Taking the time to calibrate an oven temperature puts you back in the driver’s seat.
Essential Tools: What You Absolutely Need to Calibrate an Oven Temperature
Before you start fiddling with screws or digging through menus, gather your tools. The absolute non-negotiable item for calibrating an oven temperature is a reliable, standalone oven thermometer. Your oven’s built-in dial or digital display is useless for this task – it’s the very thing we’re trying to verify and fix! Relying on it is like asking a liar if they’re lying.
Visual guide about How to Calibrate an Oven Temperature
Image source: wikihow.com
Choosing the Right Oven Thermometer
Not all thermometers are created equal. Avoid cheap, flimsy models that break easily or give wildly inaccurate readings. Look for:
- Analog (Dial) Thermometers: These are the classic choice. Choose one with a clear, easy-to-read dial (at least 2 inches in diameter) and a sturdy metal probe. Ensure it has a wide temperature range (ideally 100°F to 600°F or higher). Brands like Taylor or CDN are generally reliable. Avoid plastic dials that can warp.
- Digital Thermometers: Offer precise digital readouts and often have faster response times. Look for models specifically designed for ovens (not just meat thermometers, though some high-quality instant-read models *can* work if they have a high enough max temp and a probe that can sit securely). Ensure the display is large enough to read easily from outside the oven door. Some have magnetic backs or stands.
- Key Features: Accuracy (±5°F or better is ideal), durability (metal construction), a probe long enough to sit in the center of your oven cavity, and a stand or hook to keep it stable. Avoid thermometers with plastic parts near the probe that could melt.
While not strictly necessary, having an oven mitt handy is wise when placing or removing the thermometer. A notepad and pen (or your phone) to jot down readings is also helpful. Remember, this thermometer is your truth-teller. Invest in a good one – it’s the single most important tool for accurate oven performance.
Step-by-Step: How to Calibrate an Oven Temperature (The Foolproof Method)
Calibrating an oven temperature is simpler than you think. It boils down to two main actions: 1) Measuring the *actual* temperature inside your oven at a specific setting, and 2) Adjusting the oven’s calibration to match that reality. The exact adjustment method depends on whether you have a mechanical (dial) oven or a digital (electronic control) oven. Don’t worry – we’ll cover both. The core process, however, is the same for all ovens.

Visual guide about How to Calibrate an Oven Temperature
Image source: wikihow.com
Step 1: Preheat and Stabilize (The Critical First Step)
This step is where most people go wrong. You cannot accurately measure temperature the moment you turn the oven on. The oven needs time to reach a stable, even heat throughout the cavity.
- Place your oven thermometer securely on the center rack. Ensure it’s not touching the oven walls, floor, or heating elements. Use the stand or hook provided.
- Set your oven to a common baking temperature, like 350°F. Close the door.
- Let the oven preheat *fully*. This usually takes 20-30 minutes, but **do not rely on the oven’s preheat indicator light**. That light often turns off when the *air near the thermostat* reaches the set point, but the *entire oven cavity* may not be stable yet.
- Once the preheat light goes off (if your oven has one), **wait an additional 15-20 minutes**. This allows the heat to fully distribute and stabilize. This stabilization period is crucial for an accurate reading. Skipping it means your measurement is meaningless.
Why so long? Ovens heat unevenly initially. The back gets hot first, then the front. Waiting ensures the whole space is uniformly at the target temperature. Rushing this step is the #1 reason calibration attempts fail.
Step 2: Take the Actual Temperature Reading
After the stabilization period:
- Carefully open the oven door (use your mitt!).
- Read the temperature on your standalone thermometer. Note it down clearly (e.g., “Actual Temp at 350°F Setting: 372°F”).
- Close the oven door immediately to minimize heat loss.
- Wait another 5-10 minutes and take a second reading. If the readings are consistent (within 5°F), you have your baseline. If they fluctuate wildly, wait longer for stabilization.
This reading tells you the *truth*. If your oven is set to 350°F but the thermometer reads 372°F, your oven runs 22°F too hot. If it reads 330°F, it runs 20°F too cool. This difference is your calibration offset.
Step 3: Adjust the Calibration (Mechanical vs. Digital Ovens)
Now for the fix! How you adjust depends entirely on your oven type.
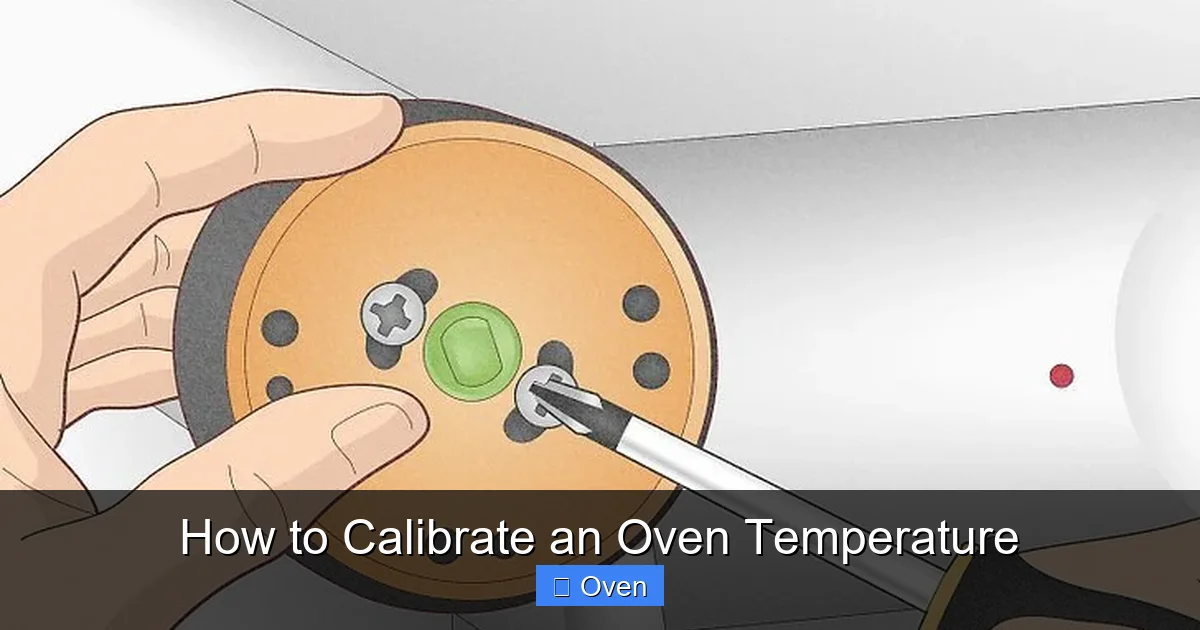
Adjusting a Mechanical (Dial) Oven
These ovens have a physical calibration screw, usually located behind the temperature dial knob.
- Turn the oven off and let it cool completely for safety.
- Carefully remove the temperature dial knob. This often just pulls straight off, but sometimes requires a small screw underneath. Consult your oven manual if unsure.
- Look for a small screw (often slotted or Phillips head) near where the knob was attached. This is the calibration screw.
- To make the oven run HOTTER (if it was reading too cool): Turn the screw **clockwise** (usually 1/8 to 1/4 turn at a time). This makes the thermostat trigger *later*, allowing the oven to get hotter before turning off.
- To make the oven run COOLER (if it was reading too hot): Turn the screw **counter-clockwise**. This makes the thermostat trigger *sooner*, turning the heat off before it gets as hot.
- Reattach the dial knob.
- Repeat Steps 1 & 2 (Preheat/Stabilize & Read) to verify the adjustment. You may need 2-3 small tweaks to get it perfect. Be patient!
Important: Turn the screw very small increments. It’s easy to overcorrect. Document each turn (e.g., “1/8 turn CW”). If you can’t find the screw or feel uncomfortable, consult a professional technician.
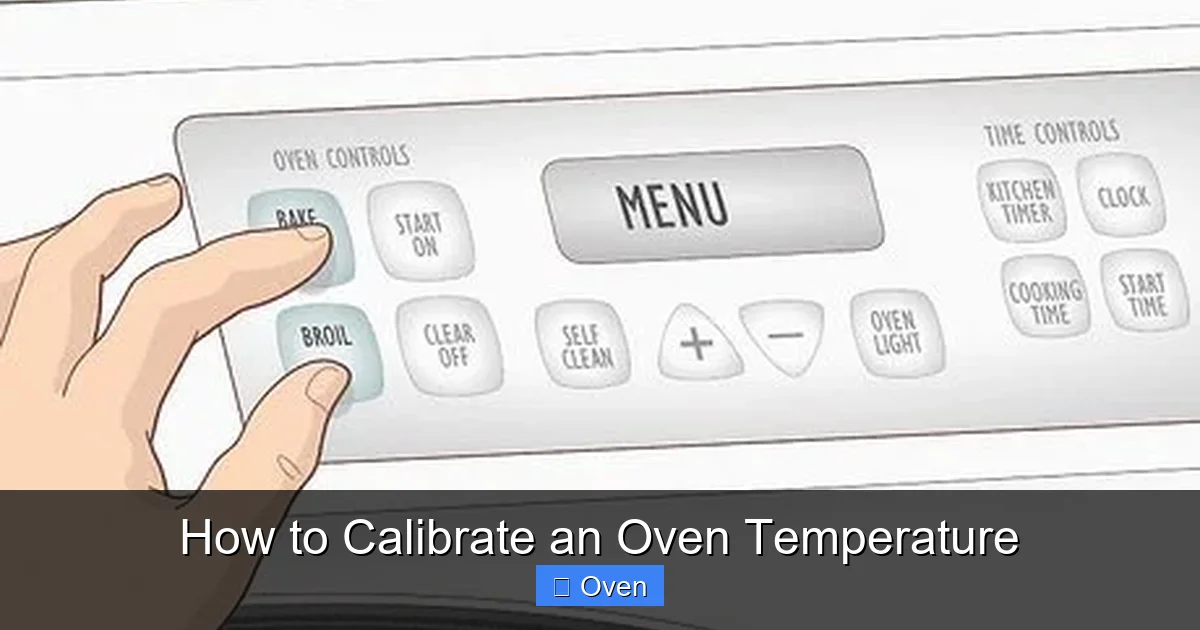
Adjusting a Digital (Electronic Control) Oven
Most modern digital ovens have a calibration setting within their control menu.
- Turn the oven off.
- Access the calibration menu. This varies wildly by brand and model. Common methods:
- Press and hold specific buttons (e.g., “Bake” + “Broil” for 3 seconds).
- Press a sequence (e.g., “Clock” -> “Start” -> “Bake”).
- Consult your oven’s user manual – this is the *best* resource! Search online for “[Your Oven Brand & Model] calibration procedure” if you’ve lost the manual.
- Once in the calibration menu, you’ll typically see an option to adjust the offset (e.g., “+25” or “-15”).
- Enter the offset based on your reading:
- If the oven ran **HOT** (e.g., set 350°F, actual 372°F), enter a **NEGATIVE** offset (e.g., -22).
- If the oven ran **COLD** (e.g., set 350°F, actual 330°F), enter a **POSITIVE** offset (e.g., +20).
- Save the setting and exit the menu.
- Repeat Steps 1 & 2 (Preheat/Stabilize & Read) to verify the adjustment. Digital adjustments are often more precise than mechanical screws.
Note: Some high-end ovens might require a technician to calibrate them. If you can’t find the menu or the adjustment doesn’t stick, check your manual or call the manufacturer.
Common Calibration Mistakes (And How to Avoid Them)
Even with the best intentions, things can go sideways. Here are the pitfalls to watch out for when learning how to calibrate an oven temperature:
Visual guide about How to Calibrate an Oven Temperature
Image source: wikihow.com
Mistake 1: Using the Wrong Thermometer (or None!)
This is the cardinal sin. Using your oven’s built-in display as the reference point is circular logic – you’re trying to fix the thing you’re using to measure the problem! A cheap, inaccurate thermometer will give you false confidence. Invest in a quality oven thermometer as outlined earlier. Don’t try to use a meat thermometer unless it’s explicitly rated for high oven temps and has a stable stand/probe holder.
Mistake 2: Not Allowing Enough Stabilization Time
Rushing the preheat and stabilization phase (Step 1) is incredibly common. Opening the door too soon, taking a reading before the oven is truly stable, or relying on the preheat light leads to inaccurate measurements. Remember: **Wait 15-20 minutes AFTER the preheat light goes off.** This patience is non-negotiable for a valid reading. Think of it like letting a steak rest – skipping it ruins the result.
Mistake 3: Adjusting Based on One Recipe or One Temperature
Ovens can behave differently at various temperatures. Just because it’s accurate at 350°F doesn’t mean it’s perfect at 200°F or 450°F. While calibrating at a common baking temp (350°F) is the essential first step, be aware that very low or very high temps might still have slight variations. If you frequently bake at extremes (like slow roasting at 225°F or pizza at 500°F+), consider checking those temps too after your main calibration. However, getting 350°F right solves 90% of home baking issues.
Mistake 4: Over-Adjusting the Calibration Screw (Mechanical Ovens)
That little screw is sensitive! Turning it a full quarter-turn might create a 50°F swing. Start with tiny adjustments – 1/8 turn or even less. Document each change. After each adjustment, you *must* repeat the full preheat/stabilize/read process to see the effect. It’s a process of small steps, not one big leap. Patience pays off here.
Mistake 5: Ignoring Oven Hot Spots (During Calibration)
While calibration fixes the *overall* temperature accuracy, ovens often have hot and cold spots *within* the cavity (e.g., back is hotter than front). Your thermometer placement matters. Always put it on the center rack, centered front-to-back and side-to-side, for your calibration reading. This gives you the “average” oven temp. Don’t calibrate based on a reading taken right over the back element! Addressing hot spots usually involves rack positioning or oven rotation during cooking, not calibration itself.
When Should You Recalibrate Your Oven? (Don’t Wait for Disaster!)
Calibrating your oven isn’t a one-and-done task. Like any precision instrument (even if it’s just your kitchen oven), it drifts over time. Waiting until your Thanksgiving turkey is undercooked is too late. Be proactive.
Regular Schedule: The Best Practice
The simplest rule: **Check and calibrate your oven temperature every 6 to 12 months.** Mark it on your calendar like an oil change for your car. This regular maintenance prevents small drifts from becoming major problems that ruin meals. If you bake or roast frequently (multiple times a week), lean towards the 6-month mark. If you use your oven less often, 12 months is usually sufficient.
Trigger Events: When to Check Immediately
Don’t wait for your scheduled check if any of these happen:
- After a Power Surge or Outage: Sudden voltage changes can jolt the thermostat out of calibration.
- After Oven Repair or Cleaning: If a technician worked on the oven, or if you had a major cleaning (especially professional cleaning that might involve moving components), check the calibration.
- After Moving the Oven: Even a small shift can affect internal components.
- When Recipes Suddenly Fail: If dishes you’ve made successfully dozens of times start consistently undercooking or burning, especially if you’ve ruled out recipe errors or ingredient changes, suspect the oven temperature.
- After Replacing the Oven Light or Other Internal Parts: While less common, it’s a good precaution.
Getting into the habit of a quick temperature check (just Steps 1 & 2, no adjustment needed if it’s accurate) before major baking projects (like holidays) is also a smart move. It only takes 30 minutes and saves immense stress.
Pro Tips for Maintaining Accurate Oven Temperatures
Calibration fixes the immediate problem, but these habits help keep your oven accurate longer and make your cooking more consistent:
Preheat Properly (Every Single Time)
Never skip preheating, and always allow that full stabilization time (20-30 min total, including the extra 15-20 min after the light goes off). Putting food into a cold or unstable oven is a major cause of uneven cooking, even with a calibrated oven. This is non-negotiable for good results.
Know Your Oven’s Hot Spots
While calibration fixes the *average* temp, hot spots remain. Do a simple test: place several oven-safe thermometers (or even slices of white bread) around the oven cavity at the same rack level during preheat. See where it’s hottest/coldest. Rotate pans during baking, or adjust rack position, to compensate. Don’t rely solely on the center rack for everything.
Avoid Overcrowding
Packing too much food into the oven blocks airflow, creating cold spots and uneven cooking. Give items space. If roasting multiple trays of vegetables, rotate them front-to-back and top-to-bottom halfway through cooking.
Use the Right Bakeware
Dark metal pans absorb heat faster and can cause bottoms to burn, even if the oven temp is accurate. Light-colored aluminum or glass is more neutral. Consider using an insulated baking sheet for delicate items like cookies if you notice consistent bottom burning.
Keep the Oven Door Closed
Every time you open the door, you lose significant heat (up to 25°F or more!), causing the oven to cycle on harder and potentially creating temperature fluctuations. Use the oven light and window to check progress. Only open when absolutely necessary (e.g., rotating pans, checking doneness near the end).
Consider an Oven Thermometer as Permanent Fixture
Once you’ve calibrated, leave your quality oven thermometer inside the oven (on the center rack) when not in use. It takes up minimal space and serves as a constant check. Before starting a new recipe, quickly glance at it after preheat to confirm it’s holding steady at your set temperature. It’s the best early warning system.
Conclusion: Take Control of Your Kitchen
Calibrating an oven temperature isn’t some obscure technical chore reserved for professional chefs. It’s a fundamental, accessible skill that every home cook should master. The frustration of sunken cakes, rubbery chicken, or perpetually undercooked casseroles often boils down to one simple fact: your oven wasn’t telling you the truth about its heat. By investing just 30 minutes with a reliable thermometer and following the steps outlined here, you reclaim control.
Think of it as tuning an instrument before a concert. Your oven is the instrument, and accurate temperature is the tuning. Without it, even the best recipe (the sheet music) and your skills (the musician) can’t produce the desired result. Once calibrated, you’ll bake with confidence, roast with precision, and finally understand why that “foolproof” recipe actually works. You’ll save money on wasted ingredients, save time on failed attempts, and most importantly, rediscover the joy of cooking and baking. Don’t let an inaccurate oven hold you back. Grab that thermometer, follow the steps, and experience the difference true temperature control makes. Your perfect cookies, roasts, and casseroles are waiting – it all starts with knowing your oven’s real temperature.
Frequently Asked Questions
Why is my oven temperature always off?
Oven thermostats drift over time due to normal wear, power fluctuations, or component aging. This is extremely common in home ovens – most run 25-50°F hotter or cooler than displayed. It’s not a defect; it’s a maintenance issue requiring calibration.
Can I calibrate my oven without a thermometer?
No, it’s impossible to accurately calibrate an oven temperature without a standalone oven thermometer. Your oven’s built-in display is the component needing adjustment, so it cannot be the reference point. A reliable external thermometer is essential.
How often should I check my oven temperature?
Check and calibrate your oven temperature every 6 to 12 months as routine maintenance. Also check it immediately after power surges, oven repairs, moving the appliance, or if recipes you know well suddenly start failing consistently.
What happens if I don’t calibrate my oven?
You’ll consistently experience undercooked or overcooked food, wasted ingredients and time, frustration with recipes, and potential food safety risks from undercooked items. Baking and roasting results will be unpredictable and often disappointing.
Is oven calibration the same as fixing hot spots?
No. Calibration fixes the *overall* temperature accuracy (the oven’s average temp vs. the set point). Hot spots are localized areas within the oven cavity that are hotter or cooler than the average, caused by airflow and element placement. Calibration doesn’t eliminate hot spots; you manage them through rack positioning and pan rotation.
Can a professional calibrate my oven for me?
Yes, appliance technicians can calibrate ovens. This is a good option if you’re uncomfortable adjusting the calibration screw yourself, can’t find the digital calibration menu, or if your oven requires specialized tools. However, the process is straightforward enough for most homeowners to do safely with the right thermometer and instructions.