Roasting coffee beans in your oven is surprisingly simple and delivers incredibly fresh, flavorful coffee without expensive gear. This method gives you full control over the roast level, from light to dark, right in your kitchen. Follow our detailed guide for safe, consistent results and unlock café-quality coffee at home.
Key Takeaways
- Safety First: Always roast in a well-ventilated area, use oven mitts, and never leave roasting beans unattended due to fire risk.
- Bean Choice Matters: Start with high-quality, green (unroasted) coffee beans; Arabica beans are ideal for beginners.
- Temperature & Time Control: Preheat your oven to 385-400°F (195-205°C); roasting typically takes 15-25 minutes depending on desired darkness.
- Constant Vigilance: Shake the pan every 3-5 minutes and watch color/smell closely – beans go from green to yellow to brown rapidly.
- Cooling is Crucial: Immediately transfer beans to a cold metal bowl or baking sheet after roasting to stop the cooking process.
- Rest Before Brewing: Let roasted beans degas for 12-24 hours in an airtight container before brewing for best flavor.
- Experiment & Record: Keep notes on time, temp, and results to refine your perfect roast profile over time.
Quick Answers to Common Questions
Can I roast coffee beans in a toaster oven?
Yes, but with caution. Toaster ovens are smaller and heat less evenly. Use a lower rack position, reduce batch size significantly (1/4 – 1/2 cup max), lower the temperature to 375°F (190°C), and check/shake much more frequently (every 2 minutes). They work best for very small batches and require extra vigilance.
How long do oven-roasted coffee beans stay fresh?
Properly stored (airtight container, cool/dark place), they stay at peak flavor for 2-4 weeks after roasting. Degassing for 12-24 hours before brewing is essential. Flavor gradually declines after 3 weeks; freezing portions can extend usability to 6-8 weeks with minimal quality loss.
Why are my roasted beans so smoky or burnt?
This usually means they were roasted too long or at too high a temperature. Ovens vary, so your “385°F” might actually be hotter. Always use an oven thermometer. Pull beans out earlier next time, especially once you hear the second crack. Ensure immediate, active cooling.
Can I reuse the same baking sheet for multiple roasts?
Yes, but clean it thoroughly between batches. Burnt coffee residue or chaff can contaminate the next roast with bitter flavors. Wash with hot, soapy water and scrub well. Avoid using soap with strong fragrances.
Do I need to remove the chaff before brewing?
Chaff (the papery skin) is harmless but can make your coffee taste slightly ashy if excessive. Most will blow away during cooling/fanning. A fine-mesh sieve can gently sift it out after cooling, but it’s not strictly necessary for most roasts. It’s more common in darker roasts.
📑 Table of Contents
- Why Roast Coffee Beans in Your Oven? The Ultimate Home Hack
- Getting Started: What You Absolutely Need
- The Roasting Process: Step-by-Step to Perfect Beans
- The Critical Cooling Phase: Stopping the Roast
- Storing Your Freshly Roasted Beans: Locking in Flavor
- Troubleshooting Common Oven Roasting Problems
- Conclusion: Your Journey to Fresher, Better Coffee Begins Now
Why Roast Coffee Beans in Your Oven? The Ultimate Home Hack
Imagine waking up to the rich, complex aroma of freshly roasted coffee, brewed just hours after the beans left the heat. No more stale supermarket beans or overpriced café runs. The secret? Your ordinary kitchen oven. Yes, that reliable appliance you use for casseroles and cookies can transform humble green coffee beans into your personal batch of liquid gold. It’s easier than you think, incredibly rewarding, and puts you in complete control of your coffee’s flavor profile.
Many coffee lovers assume roasting requires expensive, specialized equipment like drum roasters or air roasters. While those tools have their place, the oven method is a fantastic, accessible entry point. It leverages equipment you already own, demystifies the roasting process, and delivers results that put pre-ground coffee to shame. The key is understanding the science – coffee beans undergo dramatic chemical changes (the Maillard reaction and caramelization) as they heat up, developing the flavors and aromas we love. Your oven provides a consistent, dry heat environment perfect for this transformation. Plus, there’s an undeniable satisfaction in crafting your coffee from bean to cup, knowing exactly what went into it.
Getting Started: What You Absolutely Need
Before you preheat that oven, let’s gather your essentials. The beauty of oven roasting is its simplicity – you likely have most items already.

Visual guide about How to Roast Coffee Beans in Oven
Image source: bestcoffeezone.com
Essential Equipment Checklist
- Green Coffee Beans: This is non-negotiable. You need unroasted, green coffee beans. Start with 1-2 cups (about 200-400g) for your first batch. Look for reputable online suppliers (like Sweet Maria’s, Burman Coffee, or local roasters selling green beans) or some specialty grocery stores. Arabica beans are generally preferred for their nuanced flavors over Robusta.
- A Heavy-Duty Baking Sheet or Roasting Pan: Avoid thin, flimsy pans that can warp or burn. A sturdy, dark-colored metal sheet pan (like a half-sheet pan) or a cast-iron skillet works best. Dark metal absorbs and radiates heat more evenly. Avoid non-stick coatings – they can degrade at high temps and potentially release fumes.
- Oven Mitts: Seriously, don’t skip these. The pan will be extremely hot, and you’ll be handling it frequently.
- A Large Metal Bowl or Cooling Rack: For immediate cooling after roasting. A colander or fine-mesh sieve also works well. Metal conducts heat away quickly.
- Airtight Containers: For storing your cooled beans. Glass jars with rubber seals or high-quality coffee bags with one-way valves are ideal. Avoid regular plastic bags.
- A Timer: Your phone works, but keep it away from the heat!
- A Notebook and Pen: Tracking your process is vital for consistency. Note bean type, weight, oven temp, start time, color changes, crack sounds, and final roast time.
Setting Up Your Roasting Station
Choose a well-ventilated area, ideally near a window you can open or under a strong range hood. Roasting produces significant smoke and chaff (the papery skin that flakes off beans). Cover your stovetop or counter underneath the oven door with newspaper or a disposable cloth to catch falling chaff – it gets everywhere! Ensure your baking sheet fits comfortably on the middle oven rack with space for air circulation above and below. Preheat your oven to 385°F (195°C) – this is the sweet spot for most home ovens, balancing speed and control. Avoid higher temps initially; they increase the risk of scorching.
The Roasting Process: Step-by-Step to Perfect Beans
This is where the magic happens. Patience and attention are your most important tools now.

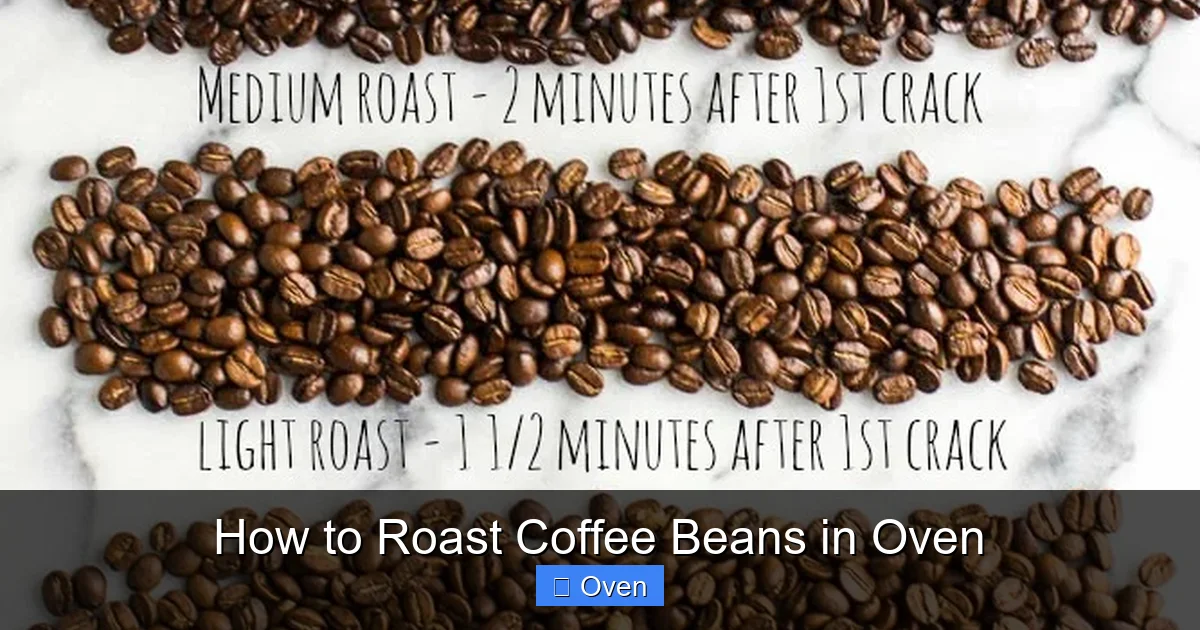
Visual guide about How to Roast Coffee Beans in Oven
Image source: wikihow.com
Loading the Pan: Don’t Overcrowd!
Spread your green beans in a single, even layer on the preheated baking sheet. Overcrowding is the #1 mistake beginners make. If beans are piled up, they steam instead of roast, leading to uneven color, baked flavors, and potential mold risk later. Leave about 1/4 to 1/2 inch of space between beans. For a standard half-sheet pan, 1-1.5 cups of green beans is usually perfect. Remember, beans expand significantly during roasting (up to 50-80% in volume).
The Roast: Watching, Listening, and Shaking
Place the pan carefully on the middle oven rack. Close the door and start your timer. Here’s what to expect and do:
- 0-5 Minutes: Beans will start to warm up. You might smell grassy or hay-like notes – this is normal for green beans. They’ll begin to turn yellow. Shake the pan gently but thoroughly after 3 minutes to ensure even heating. Use oven mitts!
- 5-10 Minutes: The yellow deepens to a light tan or cinnamon color. The grassy smell fades, replaced by a more nutty, toasty aroma. Beans will start to dry out and lose moisture. Shake the pan again at the 7-minute mark. Listen closely – you might hear the first faint “cracks,” like popcorn starting.
- 10-15 Minutes: This is the critical phase. Beans turn light brown, then medium brown. The nutty smell intensifies into rich, coffee-like aromas. The “first crack” becomes louder and more frequent – a sharp, popping sound. This signifies the bean is releasing steam and CO2, and the roast is progressing. Shake the pan vigorously every 2-3 minutes now. Pay close attention to color and smell. Light roast happens just after first crack ends (around 12-15 mins for many beans).
- 15-20+ Minutes: Beans darken to medium-brown (City roast) or dark brown (Full City). The aroma becomes deeply roasted, almost chocolatey or smoky. You might hear a second, deeper, more rolling crack – this signals oils migrating to the surface (Medium-Dark to Dark roast). Shake constantly now. Dark roasts develop quickly; stop immediately if you see significant oil on the surface or smell acrid smoke (burnt!).
Pro Tip: Don’t rely solely on time. Ovens vary wildly. A gas oven might roast faster than electric. Your specific bean density matters too. Your senses are the best guide: Watch the color shift from yellow to light brown to dark brown. Listen for the cracks. Smell the progression from grassy to nutty to deeply roasted. When the color and smell match your target (e.g., light brown with a clean aroma for light roast), it’s time to stop.
Knowing When to Stop: Targeting Your Roast Level
Pulling the beans out at the precise moment is crucial. Here’s a quick reference:
- Light Roast (Cinnamon): Stop just as or right after first crack finishes. Beans are light brown, dry surface, no oil. Bright, acidic, floral, or fruity notes. (Approx. 12-15 mins at 385°F).
- Medium Roast (American/City): Stop during or just after first crack ends, before second crack starts. Beans are medium brown, balanced acidity and body, nutty or chocolatey notes. (Approx. 15-18 mins).
- Medium-Dark Roast (Full City): Stop early in second crack. Beans are rich dark brown, slight oil sheen, lower acidity, pronounced body, caramel or spice notes. (Approx. 18-22 mins).
- Dark Roast (High/Continental): Stop late in second crack or just after it ends. Beans are very dark brown to black, shiny with oil, bold smoky/bitter notes, minimal acidity. (Approx. 22-25+ mins – proceed with extreme caution!).
Warning: Dark roasts happen fast! Once second crack starts, check every 30 seconds. Burnt coffee is bitter and unpleasant. If you see thick, acrid smoke or smell burning wood, pull the beans out IMMEDIATELY – they are ruined.
The Critical Cooling Phase: Stopping the Roast
This step is non-negotiable and often overlooked by beginners. Removing beans from the oven doesn’t stop the roasting – residual heat continues cooking them, potentially pushing them into burnt territory.
Visual guide about How to Roast Coffee Beans in Oven
Image source: kitchenjoyblog.com
Immediate Action Required
As soon as you decide the roast is done, use oven mitts to swiftly pull the pan out of the oven. Don’t hesitate! Immediately pour the hot beans into your waiting large metal bowl, colander, or onto a clean, cold baking sheet. Spread them out in a thin layer if possible.
Active Cooling Techniques
Simply leaving them to cool passively is too slow. You need to accelerate the process:
- Stir Vigorously: Use a heatproof spatula or spoon to stir the beans constantly for 1-2 minutes. This brings hotter inner beans to the surface.
- Toss and Shake: If using a bowl or colander, shake it gently but firmly to circulate air.
- Fan Them: Use a kitchen towel, piece of cardboard, or even a small fan (pointed away from the beans to avoid blowing chaff everywhere) to blow air over the beans. This rapidly removes heat and chaff.
Cooling should take 3-5 minutes total. Beans are ready when they feel cool to the touch and are no longer steaming. You’ll hear the crackling subside completely. Do not skip this step! Inadequate cooling leads to over-roasted, bitter coffee.
Storing Your Freshly Roasted Beans: Locking in Flavor
Freshly roasted beans are at their peak flavor potential, but they’re also releasing carbon dioxide (degassing) and are vulnerable to staling factors. Proper storage is key to preserving that amazing freshness.
The Degassing Window: Patience Pays Off
Right after cooling, beans are very “gassy.” If you seal them tightly immediately, pressure can build up and potentially burst the container. More importantly, brewing too soon (within the first 12-24 hours) often results in flat, under-extracted coffee because the CO2 bubbles interfere with water contact. Allow beans to degas for at least 12-24 hours before brewing. During this time, store them in a container that allows some gas exchange.
Optimal Storage Methods
- Short-Term (1-3 Weeks): Use an airtight container with a one-way valve (like specialty coffee bags) or a jar with a loose-fitting lid for the first 24 hours, then seal tightly. Store in a cool, dark cupboard – never in the fridge or freezer for short-term storage. Fridge humidity and temperature fluctuations cause condensation and staling; freezer storage risks moisture absorption and flavor contamination.
- Longer-Term (Up to 6 Weeks): For beans you won’t use within 3 weeks, portion them into airtight bags or containers, squeeze out ALL air, and freeze. Thaw portions at room temperature in a sealed container (to prevent condensation) before grinding. Freezing pauses staling but doesn’t reverse it; flavor won’t be *quite* as vibrant as fresh, but it’s far better than stale beans.
Avoid: Clear glass jars on the counter (light degrades beans), regular plastic bags (they aren’t truly airtight), and storing near strong odors (coffee absorbs smells).
Troubleshooting Common Oven Roasting Problems
Even with the best intentions, things can go sideways. Here’s how to diagnose and fix common issues:
Beans Are Unevenly Roasted (Some Light, Some Dark)
Cause: Overcrowded pan, insufficient shaking, oven hot spots.
Solution: Use less beans per batch, shake the pan more frequently and vigorously (every 2-3 mins during critical phases), rotate the pan 180 degrees halfway through roasting if your oven has hot spots. Consider using an oven thermometer to verify actual temperature.
Beans Taste Baked, Flat, or Like Hay
Cause: Roasted too slowly at too low a temperature, or beans were steamed due to overcrowding.
Solution: Ensure oven is fully preheated to 385-400°F. Avoid overcrowding – use a single layer. Roast at the higher end of the temp range (400°F) for a slightly faster, drier roast. Make sure beans are completely dry before roasting (green beans should be).
Beans Are Burnt or Acrid
Cause: Roasted too long, oven temperature too high, or inadequate cooling.
Solution: Pull beans out EARLIER next time. Double-check oven temp with a thermometer. Practice cooling immediately and actively. If beans are only slightly overdone, they might still be usable for espresso where bitterness is masked, but often they’re best discarded.
Beans Are Oily (Especially for Lighter Roasts)
Cause: Typically indicates a darker roast (oils migrate to surface during medium-dark/dark roasts). For lighter roasts, it could mean roasting too long at high heat or a very dense bean.
Solution: For lighter roasts, stop the roast sooner. Ensure you’re not roasting at excessively high temperatures. Some bean varieties (like Sumatrans) are naturally oilier even at medium roasts – it’s not always a flaw.
No Cracks Heard
Cause: Oven temperature too low, beans too moist, or insufficient roasting time.
Solution: Verify oven temperature with a thermometer. Ensure beans are dry. Extend roasting time slightly, but monitor color and smell closely. Some very dense beans crack later.
Conclusion: Your Journey to Fresher, Better Coffee Begins Now
Roasting coffee beans in your oven isn’t just a method; it’s an invitation to deepen your connection with your daily cup. You’ve moved beyond being a passive consumer to becoming an active participant in the coffee’s journey, unlocking flavors and aromas that pre-roasted beans simply cannot match. The initial learning curve is gentle, the equipment is minimal, and the rewards – that first sip of coffee made from beans you roasted yourself – are profoundly satisfying. The rich, complex notes, the vibrant acidity of a light roast, or the deep chocolatey body of a medium roast, all crafted by your own hands, elevate the experience from mere caffeine delivery to a true ritual.
Remember, perfection comes with practice. Your first batch might not be flawless, and that’s okay! Embrace the experimentation. Keep meticulous notes on bean origin, weight, oven temp, time, and sensory observations. Adjust variables slightly each time – maybe a minute less for a lighter roast, or a vigorous shake at a different stage. Pay attention to how different bean varieties (Ethiopian vs. Colombian vs. Brazilian) respond to the oven’s heat. Soon, you’ll develop an intuitive sense for the process, knowing exactly when that perfect shade of brown and that unmistakable roasted aroma signal “stop.” The investment is minimal – a bag of green beans and a bit of your time – but the return is a constant supply of incredibly fresh, personalized coffee that transforms your kitchen into your favorite café. So, preheat that oven, grab your green beans, and take the first step towards coffee nirvana. Your taste buds will thank you.
Frequently Asked Questions
What temperature should I set my oven for roasting coffee beans?
The ideal starting temperature is 385°F to 400°F (195°C to 205°C). Begin at 385°F for better control, especially for light and medium roasts. If your oven runs hot (verified with a thermometer), you might need to go slightly lower. Avoid temperatures above 425°F as they increase scorching risk significantly.
How do I know when the coffee beans are done roasting in the oven?
Rely on your senses, not just the timer. Watch for color change from green to yellow to brown. Listen for the “first crack” (sharp popping sounds) indicating light/medium roast development and the deeper “second crack” for darker roasts. Smell the progression from grassy to nutty to deeply roasted. Pull beans out when the color and aroma match your desired roast level (e.g., light brown with clean aroma for light roast).
Can I roast coffee beans in a glass baking dish?
It’s not recommended. Glass heats and cools slowly, leading to uneven roasting and a higher risk of the beans “baking” instead of roasting properly. It also doesn’t conduct heat as efficiently as metal. Stick with heavy-duty metal baking sheets or cast iron for best, most consistent results.
Why do my roasted coffee beans taste bitter?
Bitterness is usually caused by over-roasting (roasting too long or at too high a temperature) or inadequate cooling (residual heat continuing to cook the beans). It can also occur if beans are scorched due to hot spots in the oven or insufficient shaking. Ensure you pull beans out at the right time and cool them rapidly and thoroughly.
How much green coffee do I need for a standard batch?
Start with 1 to 1.5 cups (approximately 200-300 grams) of green beans for a standard half-sheet baking pan. This ensures a single layer with space for even roasting. Remember, beans expand by 50-80% in volume during roasting, so 1 cup of green beans yields about 1.5-1.8 cups of roasted beans.
Is oven-roasted coffee as good as professionally roasted coffee?
Freshly oven-roasted coffee, when done carefully, can be exceptionally good and often surpasses pre-roasted beans bought from stores due to its freshness. While professional roasters have more precise control, a skilled home roaster using the oven method can achieve excellent, nuanced results, especially for light and medium roasts. The key advantage is the unbeatable freshness of beans roasted just days or even hours before brewing.