Rotisserie in air fryer ovens unlocks restaurant-quality results at home. This guide reveals how to set up, cook, and maintain your rotisserie for perfectly juicy chicken, veggies, and more – no extra appliances needed! Discover simple steps and pro tricks to maximize this game-changing feature.
Key Takeaways
- Rotisserie beats regular air frying for even cooking: The constant rotation ensures all sides get equal heat and crispiness, preventing dry spots on large cuts like whole chickens.
- Prep is non-negotiable: Pat food dry, truss poultry securely, and use minimal oil to avoid splatter and ensure the rotisserie turns smoothly.
- Lower temps, longer times: Rotisserie generally needs 25-50°F lower temps and 15-25% more time than standard air frying due to the slower rotation speed.
- Clean immediately after use: Food residue hardens on the spit and forks when cool. Soak parts in warm soapy water right after cooking for easy cleaning.
- Versatility is key: Beyond chicken, rotisserie works great for pork loin, vegetables, kebabs, and even whole fish – get creative!
- Safety first: Always use oven mitts, ensure the rotisserie is fully seated, and never force the motor if it stalls.
Quick Answers to Common Questions
Can I use the rotisserie function without the air fry basket?
Yes, absolutely! In fact, you *must* use the rotisserie without the air fry basket. The basket blocks the rotation path and prevents the spit rod from connecting to the motor. The rotisserie needs the full, unobstructed oven cavity to function properly.
How often should I clean the rotisserie parts?
Clean the spit rod and forks **immediately after every single use**, while they are still warm (but not hot). Soak them in warm soapy water right away. The drip tray should also be cleaned after each use. Deep clean the oven cavity interior weekly or as splatters occur.
Can I rotisserie a frozen chicken?
It’s **strongly discouraged**. Cooking frozen poultry unevenly increases the risk of foodborne illness. The outside can overcook and dry out before the inside reaches a safe temperature. Always thaw chicken completely in the refrigerator before rotisserie cooking.
Why is my rotisserie chicken pale and not crispy?
The most common causes are insufficient drying of the skin before cooking and using too low a temperature. Pat the chicken skin *extremely* dry with paper towels. Ensure you’re cooking at 350-375°F (not lower). A light coating of oil or butter on the skin also helps promote browning.
Can I use wooden skewers for rotisserie kebabs?
Yes, but **soak them thoroughly** in water for at least 30 minutes before threading your food. This prevents them from burning during the longer cooking time. Metal skewers are generally sturdier and preferred for rotisserie, but soaked wooden ones work for smaller kebabs.
📑 Table of Contents
- Unlock Restaurant-Quality Meals: Your Complete Guide to Rotisserie in Air Fryer Oven
- Understanding Your Air Fryer Oven’s Rotisserie: How It Actually Works
- Step-by-Step: Setting Up Your Rotisserie for Perfect Results Every Time
- Mastering Rotisserie Cooking: Techniques, Timing, and Temperature Tips
- Cleaning and Maintaining Your Rotisserie: Ensuring Longevity
- Beyond Chicken: Delicious Rotisserie Recipe Ideas to Try
- Troubleshooting Common Rotisserie Problems
- Conclusion: Elevate Your Home Cooking with Rotisserie Magic
Unlock Restaurant-Quality Meals: Your Complete Guide to Rotisserie in Air Fryer Oven
Remember that mouthwatering, evenly cooked, golden-brown chicken you get at a restaurant? The kind that’s juicy inside and perfectly crisp outside? You might think it requires a professional rotisserie oven costing thousands. But guess what? That same magic is likely sitting right on your countertop, hidden within your air fryer oven. Yes, that versatile appliance you use for fries and reheating pizza often has a rotisserie function waiting to be unleashed. It’s a game-changer for home cooks, offering a level of even cooking and flavor infusion that standard air frying simply can’t match for larger items.
Using the rotisserie in your air fryer oven isn’t just about cooking a whole chicken (though that’s fantastic!). It’s about transforming how you approach roasting vegetables, cooking pork tenderloins, or even making kebabs. The constant, slow rotation ensures every inch of your food gets kissed by the hot air, resulting in incredible moisture retention and an even, beautiful sear. No more flipping halfway through or worrying about one side being undercooked while the other burns. It’s the secret weapon for impressive, hands-off meals that taste like you spent hours in the kitchen. This guide will walk you through everything you need to know to master this feature, from setup to serving, so you can confidently create delicious rotisserie meals right at home.
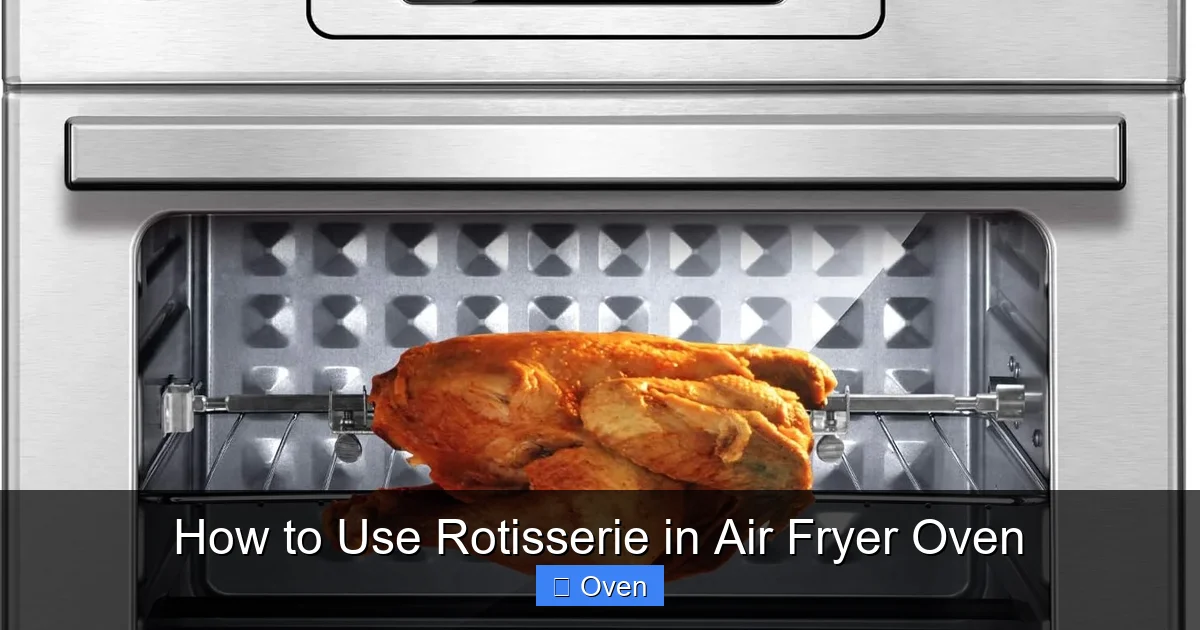
Understanding Your Air Fryer Oven’s Rotisserie: How It Actually Works
Visual guide about How to Use Rotisserie in Air Fryer Oven
Image source: m.media-amazon.com
Before you start skewering your chicken, it’s crucial to understand the mechanics. Unlike a dedicated countertop rotisserie oven, the rotisserie function in most air fryer ovens (like those from Ninja, Cosori, Instant Pot, or Breville) leverages the existing convection fan and heating elements. The key component is the motorized spit rod assembly. This rod runs horizontally through the center of the cooking chamber, powered by a small motor usually located at the back or side of the oven.
The Rotisserie Assembly: Parts Breakdown
Your air fryer oven’s rotisserie kit typically includes:
* **The Spit Rod:** A long, metal rod (often stainless steel) that pierces through the food. It has a pointed end and a handle end.
* **Forks/Skewers:** Two or more sturdy metal forks that slide onto the spit rod. These grip the food securely, preventing it from spinning loosely. Some kits have adjustable forks.
* **Motor Coupling:** This connects the spit rod to the motor inside the oven. It’s usually a simple slot or keyway that the rod handle slots into.
* **Support Brackets (Sometimes):** Small metal arms that hold the ends of the spit rod steady within the oven cavity, preventing wobble.
The Rotation Advantage: Why It Matters
This is where the rotisserie shines. As the motor turns the spit rod slowly (usually 1-3 rotations per minute), your food rotates continuously within the hot air stream created by the convection fan. This constant movement achieves several critical things:
1. **Even Heat Distribution:** Every surface of the food is exposed to the heating elements and hot air for an equal amount of time. No more “hot spots” or uneven cooking.
2. **Self-Basting Effect:** Natural juices and rendered fat continuously flow over the food’s surface as it rotates, basting it from within. This is key to incredible moisture and flavor.
3. **Superior Crisping:** The consistent exposure to hot air creates a more uniform, golden-brown, crispy exterior compared to static air frying, where the bottom side often gets less direct heat.
4. **Hands-Off Cooking:** Once set up and started, the rotisserie does the work. No need to open the door to flip or rotate food, which causes heat loss.
Understanding this mechanism helps you appreciate why specific prep steps (like trussing poultry) are essential – the food *must* be securely attached to rotate smoothly without wobbling or falling off.
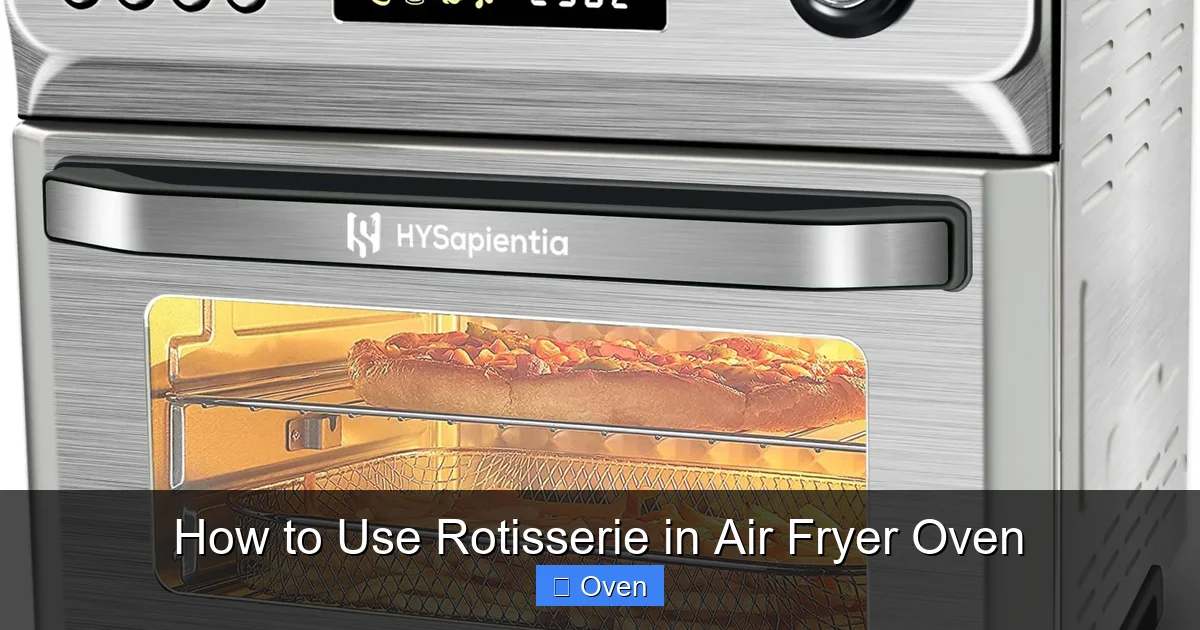
Step-by-Step: Setting Up Your Rotisserie for Perfect Results Every Time

Visual guide about How to Use Rotisserie in Air Fryer Oven
Image source: i.ytimg.com
Jumping straight into cooking without proper setup is the fastest way to end up with a lopsided chicken or a messy oven. Don’t skip these steps! Proper preparation ensures safety, even cooking, and easy cleanup.
Prepping Your Food: The Foundation of Success
* **Pat Dry Relentlessly:** Moisture is the enemy of crispiness. Use paper towels to thoroughly dry the *entire* surface of your food – chicken, pork, veggies. This is non-negotiable for that perfect rotisserie sear.
* **Truss Poultry Securely:** For chickens, turkeys, or large birds, trussing is critical. Tie the legs together tightly with kitchen twine and tuck the wing tips behind the back. This creates a compact, even shape that rotates smoothly and cooks uniformly. Uneven shapes cause wobbling and uneven cooking. (Pro Tip: Watch a quick 60-second trussing video online – it’s easier than it sounds!).
* **Season Generously (But Smartly):** Rub your food all over with your favorite dry rub, herbs, spices, and a *light* coating of oil (like avocado or olive oil). Avoid wet marinades right before cooking, as they can drip excessively and cause smoking. If using a wet marinade, pat the food *extremely* dry afterward.
* **Consider Size & Weight:** Ensure your food fits comfortably within the oven cavity with the rotisserie assembly, allowing at least 1-2 inches of clearance from the heating elements and walls. Overly large items can touch elements or not rotate properly. Most air fryer ovens handle a 3-4 lb chicken well.
Assembling the Rotisserie: Safety and Stability First
1. **Clean the Parts:** Always start with clean spit rod and forks. Residue from previous cooks can burn and smoke.
2. **Slide on the Forks:** Place one fork onto the spit rod, pointed end facing inward. Slide it towards the center. Add your food. Slide the second fork onto the opposite end, pointed end facing inward, and tighten it firmly against the food. The forks should grip the food securely without puncturing it excessively. For very large items, a third fork might be needed in the middle.
3. **Check Balance:** Hold the assembled spit horizontally. Does it feel balanced? Does one side dip significantly? Adjust the forks or trussing to achieve as close to perfect balance as possible. An unbalanced load strains the motor and causes wobbling.
4. **Insert into the Oven:** Open the oven door. Locate the motor coupling (usually a slot or hole at the back center). Carefully slide the handle end of the spit rod into this coupling. Ensure it’s fully seated and secure. The other end should rest steadily on the support bracket (if your model has one) or simply hang freely but balanced.
5. **Final Safety Check:** Gently try to rotate the spit rod by hand (with the motor off!). It should turn smoothly without catching or excessive resistance. Ensure nothing is touching the heating elements. Close the door securely.
Preheating: Don’t Skip This Crucial Step!
Just like with a traditional oven, preheating your air fryer oven *with the rotisserie assembly inside* is vital. Turn on the rotisserie function and let the oven heat to your target temperature (usually 350-375°F for chicken) for 5-10 minutes. This ensures the cooking starts immediately at the right temp and the motor warms up gently. Putting cold food into a cold oven leads to longer cooking times and less consistent results.
Mastering Rotisserie Cooking: Techniques, Timing, and Temperature Tips
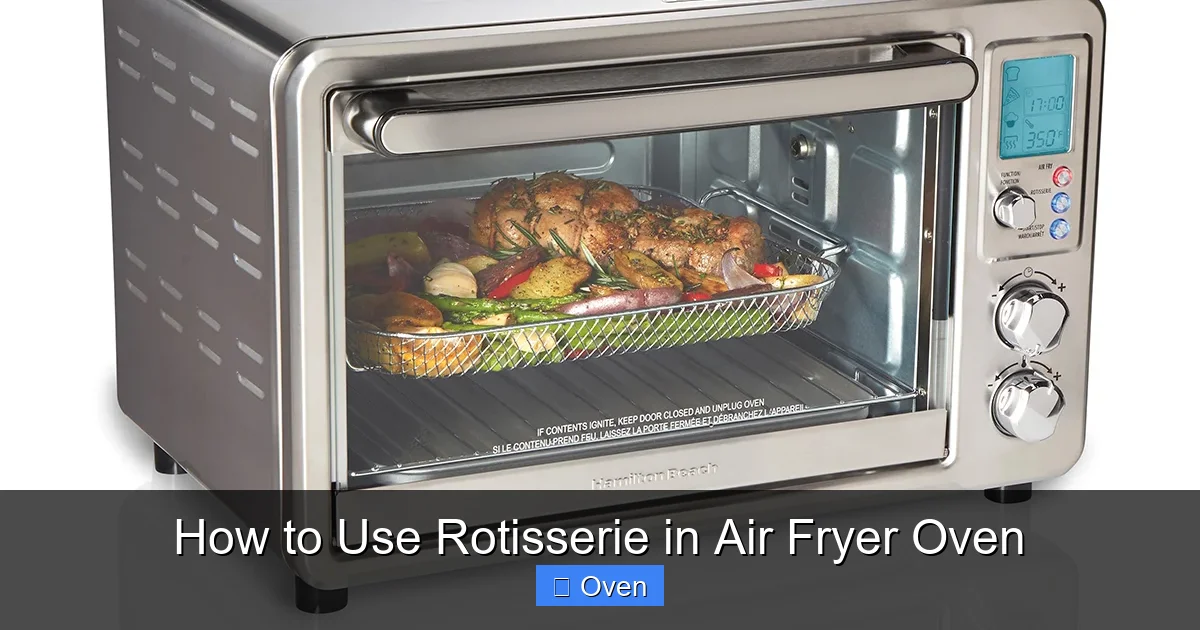
Visual guide about How to Use Rotisserie in Air Fryer Oven
Image source: hamiltonbeach.com
Now for the fun part – cooking! Rotisserie timing and temperature differ significantly from standard air frying. Understanding these nuances is key to perfection.
The Golden Rule: Lower Temp, Longer Time
Because the food rotates slowly, it cooks more gently and evenly than under the intense, direct blast of standard air frying. **As a general rule, reduce your usual air fryer temperature by 25-50°F and increase cooking time by 15-25%.** For example:
* **Whole Chicken (3-4 lbs):** Cook at 350-375°F for 45-65 minutes. *Never rely solely on time!* Use an instant-read meat thermometer. The thickest part of the thigh should reach 165°F, and the breast 160°F (carryover cooking will take it to 165°F).
* **Pork Loin (1.5-2 lbs):** Cook at 350°F for 35-50 minutes, or until internal temp reaches 145°F.
* **Large Vegetables (Potatoes, Carrots, Onions):** Toss chunks with oil, salt, and herbs. Cook at 375°F for 25-40 minutes, until tender and caramelized.
* **Kebabs:** Thread sturdy veggies and/or marinated meat cubes onto skewers (if using wooden, soak for 30 mins first). Secure ends with forks. Cook at 375°F for 15-25 minutes, turning occasionally if possible (though rotation helps!).
Using the Right Accessories and Settings
* **The Drip Tray is Essential:** Always place the included drip tray or a small oven-safe pan on the bottom rack *under* the rotisserie. This catches all the rendered fat and juices, preventing smoke, flare-ups, and messy oven cleanups. Line it with foil for easier disposal.
* **Avoid the Air Fry Basket:** Never try to use the rotisserie *inside* the air fry basket. The basket blocks the rotation path and the motor coupling. The rotisserie needs the full oven cavity.
* **Utilize Presets (If Available):** Many models have a “Rotisserie” or “Chicken” preset. These are great starting points, but *always* verify doneness with a thermometer, as oven variances exist.
* **Basting (Optional but Recommended):** While the rotation provides natural basting, you can enhance flavor. After the first 20-30 minutes, carefully open the door (use mitts!) and brush the food with pan juices, melted butter, or a glaze. Do this quickly to minimize heat loss.
Doneness: The Thermometer is Your Best Friend
Guessing is the enemy of perfect rotisserie. An instant-read meat thermometer (like Thermapen) is the single most important tool you can own. Insert it into the thickest part of the meat, avoiding bone. For poultry, check the thigh and breast. For pork, check the center. Remember carryover cooking – the temp will rise 5-10°F after resting. Pull food out 5°F before your target temp for poultry (160°F breast, 160°F thigh) and pork (140°F). Resting for 10-15 minutes allows juices to redistribute, ensuring maximum moisture.
Cleaning and Maintaining Your Rotisserie: Ensuring Longevity
The rotisserie function is amazing, but neglecting cleanup is the fastest way to ruin it. Food residue baked onto the spit rod and forks becomes incredibly difficult to remove later and can cause smoking or burning on subsequent uses.
Immediate Post-Cook Cleaning is Crucial
1. **Safety First:** Always use heavy-duty oven mitts. The spit rod, forks, and oven interior are extremely hot.
2. **Remove Promptly:** Once cooking is done and the oven has cooled *slightly* (but is still warm), carefully remove the rotisserie assembly. Place it on a heat-safe surface (like a baking sheet or trivet).
3. **Soak Immediately:** Fill your sink or a large container with warm, soapy water. Submerge the spit rod and forks *right away*. Let them soak for at least 15-30 minutes while you eat or clean other parts. This loosens grease and food particles dramatically.
4. **Scrub Gently:** Use a non-abrasive sponge or brush (avoid steel wool on non-stick coatings if applicable) to clean the parts. For stubborn bits, a paste of baking soda and water can help. Pay attention to the grooves where the forks slide on.
5. **Clean the Drip Tray:** Empty the cooled fat/juices (let fat solidify first for easy disposal). Wash the tray with warm soapy water. For baked-on grease, soak in hot, soapy water or use an oven cleaner spray (follow instructions, rinse thoroughly).
6. **Wipe the Oven Cavity:** While the oven is still warm (not hot!), wipe down the interior walls and ceiling with a damp cloth or sponge to remove any splatters. Avoid getting water near the heating elements or motor housing. For tough grease, use a dedicated oven cleaner spray *sparingly* and wipe clean.
Deep Cleaning and Long-Term Care
* **Monthly Motor Check:** Every few uses, visually inspect the motor coupling area (where the spit rod connects) for any built-up grease or debris. Wipe gently with a dry cloth if needed. Avoid spraying cleaners directly into this area.
* **Check for Wear:** Periodically inspect the spit rod for bends and the forks for cracks or excessive wear. Replace parts if damaged – safety first!
* **Store Properly:** Once completely dry, store the rotisserie parts together in a designated spot (a drawer or container) to prevent losing pieces. Don’t cram them in with other utensils.
* **Avoid Dishwasher (Usually):** While some manufacturers say parts are dishwasher safe, hand washing is always gentler and prevents potential warping or damage to finishes. Check your manual, but soaking and hand scrubbing is the safest bet.
Beyond Chicken: Delicious Rotisserie Recipe Ideas to Try
While a perfectly rotisserie chicken is a classic, don’t limit yourself! The rotisserie function is incredibly versatile. Here are some inspiring ideas to get you started:
Juicy Pork Perfection
* **Pork Tenderloin:** Truss if needed. Rub with olive oil, garlic powder, smoked paprika, salt, and pepper. Cook at 350°F for 25-35 minutes, or until 145°F internally. Rest 10 mins. Slices beautifully.
* **Pork Loin Roast:** A larger cut (2-3 lbs). Season generously. Cook at 350°F for 45-60 minutes, or until 145°F. Excellent for Sunday dinner leftovers.
* **Rotisserie Pork Belly:** Score the skin, rub with salt, and maybe a little five-spice. Cook at 325°F for 60-90 minutes until skin is crackly and meat is tender. Render incredible fat for roasting potatoes!
Vegetable Magic
* **Whole Roasted Vegetables:** Toss whole baby potatoes, carrots, and onions with oil, rosemary, and thyme. Skewer them tightly together on the spit rod using the forks to hold bundles. Cook at 375°F for 30-45 minutes until tender and caramelized.
* **Bell Pepper “Steaks”:** Slice large bell peppers into thick planks. Brush with oil and season. Skewer horizontally. Cook at 375°F for 15-20 minutes until slightly charred and tender-crisp.
* **Whole Cauliflower or Broccoli:** Remove leaves and stem base. Rub with tahini, lemon juice, garlic, and cumin. Skewer through the core. Cook at 375°F for 35-45 minutes until tender and golden.
Creative Twists
* **Rotisserie Kebabs:** Thread marinated chicken, shrimp, or tofu cubes with bell peppers, onions, and zucchini onto metal skewers. Secure ends tightly with forks. Cook at 375°F for 15-25 minutes.
* **Whole Fish:** Clean and pat a whole trout, sea bass, or snapper very dry. Stuff cavity with lemon slices, herbs, and garlic. Truss loosely. Cook at 375°F for 20-30 minutes per pound, or until flesh flakes easily.
* **Rotisserie Leg of Lamb:** A showstopper! Trim excess fat, make small incisions, and rub with garlic, rosemary, and olive oil. Cook at 325°F for 60-90 minutes (depending on size) until 135°F for medium-rare. Rest well.
Troubleshooting Common Rotisserie Problems
Even with the best prep, things can occasionally go sideways. Here’s how to handle the most frequent issues:
Motor Won’t Turn or Stalls
* **Cause:** Food is unbalanced, too large, or forks aren’t gripping securely. Obstruction in the motor coupling. Motor overheating (rare).
* **Fix:** Turn off and unplug the oven. Carefully remove the rotisserie. Check balance – adjust trussing or fork placement. Ensure nothing is blocking the rotation path. Clean the motor coupling area gently. Let the oven cool completely before retrying. If it persists, consult your manual – the motor may need service.
Food is Cooking Unevenly (One Side Darker)
* **Cause:** Imperfect balance causing wobble. Heating element imbalance (less common in modern units). Food touching the oven wall or element.
* **Fix:** Ensure perfect trussing and fork grip for balance. Verify food has adequate clearance (1-2 inches) from all sides. If one side consistently browns faster, slightly reduce the temperature and extend cooking time slightly, relying on the thermometer for doneness.
Excessive Smoke or Burning Smell
* **Cause:** Fat/juices dripping directly onto heating elements (drip tray missing or overflowing). Food residue on spit/forks from previous use. Over-oiling food.
* **Fix:** **ALWAYS use the drip tray!** Clean the tray immediately after cooking. Ensure spit/forks are meticulously cleaned after *every* use. Pat food extremely dry and use minimal oil. If smoking occurs during cooking, carefully remove food (use mitts!), let oven cool, and clean thoroughly before next use.
Food is Dry
* **Cause:** Overcooking (most common!). Cooking at too high a temperature. Not resting before carving.
* **Fix:** **Use a meat thermometer religiously.** Pull food out 5°F before target temp. Cook at the recommended lower rotisserie temps (350-375°F vs 400°F for air frying). Always rest meat for 10-15 minutes tented loosely with foil before slicing.
Spit Rod is Hard to Insert/Remove
* **Cause:** Motor coupling is stiff or dirty. Spit rod handle isn’t aligned properly.
* **Fix:** Ensure the oven is cool. Gently wiggle the handle while applying steady pressure. Clean the coupling slot with a dry cloth or soft brush. Never force it – if it doesn’t go in easily, stop and check alignment.
Conclusion: Elevate Your Home Cooking with Rotisserie Magic
Mastering how to use rotisserie in air fryer oven transforms a convenient countertop appliance into a true culinary powerhouse. It’s not just about cooking a chicken; it’s about unlocking a world of evenly cooked, incredibly juicy, and flavorful meals with minimal hands-on effort. The slow rotation mimics professional techniques, delivering results that consistently impress family and guests alike.
The key to success lies in the details: meticulous food prep (drying and trussing), proper assembly for balance and safety, understanding the need for lower temperatures and longer times, and committing to immediate cleanup. Don’t be intimidated – start with a simple chicken or pork tenderloin. Follow the steps, trust your thermometer, and savor the difference. You’ll quickly discover why rotisserie cooking is beloved by chefs. It’s the secret to achieving that perfect balance of crispy exterior and succulent interior that defines truly great roasted food. So, dust off that rotisserie kit, fire up your air fryer oven, and get ready to revolutionize your weeknight dinners and special occasion feasts. The perfect rotisserie meal is just a rotation away!
Frequently Asked Questions
What size chicken can I rotisserie in my air fryer oven?
Most standard air fryer ovens (like 6-10 quart models) handle chickens up to 4-5 pounds comfortably. Always check your specific model’s manual for the maximum weight recommendation. Ensure there’s at least 1-2 inches of clearance between the chicken and the oven walls/heating elements for proper air circulation and rotation.
Do I need to baste rotisserie chicken while it cooks?
Basting isn’t strictly necessary because the constant rotation provides natural self-basting as juices flow over the meat. However, opening the door briefly after 20-30 minutes to brush with pan juices, melted butter, or a glaze can add extra flavor and shine. Do this quickly to minimize heat loss, and only if your recipe calls for it.
Why does my rotisserie motor make a grinding noise?
A grinding noise usually indicates an imbalance or obstruction. Turn off and unplug the oven immediately. Check that the chicken (or other food) is securely trussed and gripped by the forks, and that it’s perfectly balanced. Ensure nothing is touching the oven walls or elements. Clean the motor coupling area. If the noise persists after checking these things, the motor may be faulty and require professional service.
Can I rotisserie vegetables without meat?
Absolutely! Rotisserie is fantastic for vegetables. Toss sturdy veggies like potatoes, carrots, onions, bell peppers, or cauliflower florets with oil, salt, and herbs. Skewer them tightly together on the spit rod using the forks to hold bundles. Cook at 375°F for 25-45 minutes, until tender and caramelized. They won’t render fat like meat, so no drip tray is strictly needed, but using one prevents any potential mess.
How do I know when rotisserie chicken is done without a thermometer?
While a meat thermometer is **highly recommended** for safety and accuracy, you can check for doneness by: 1) Juices running clear when you pierce the thickest part of the thigh (not reliable alone), 2) The leg moving freely in its socket, and 3) The internal temperature reaching 165°F in the thigh (thermometer is essential for this). Relying solely on time or color is risky and can lead to undercooked or dry chicken.
Can I use the rotisserie function for baking or other tasks?
The rotisserie function is specifically designed for rotating large cuts of meat, poultry, or vegetable bundles. It’s not suitable for baking cakes, cookies, or casseroles, as these items need stable, even heat without rotation. The constant turning would ruin the structure of baked goods. Stick to roasting and rotisserie-style cooking for this function.